It’s easy enough to buy a cobalt-blue KitchenAid mixer these days, but the color is really hard to find in older models. The KSM90 “Ultra Power” tilt-head was the first of the cobalt-blue machines; it was made as an “exclusive” for Williams-Sonoma. They’re findable on eBay, but frequently command a premium, even when sold “for parts or repair”.
Even harder to find is the cobalt-blue bowl-lift model (K5SS). Seller-refurbished ones are selling on eBay for close to $500 (roughly the cost of a new mixer) — when you can find them. Good luck finding one that needs work.
So, when one of my sisters said “I’ve always wanted a blue mixer, can you find me one?” …sure. Tilt-head or bowl-lift? “Bowl-lift, I only have tilt-heads now.” Uh… OK. Challenge accepted.
Remarkably, though, I got lucky and found just the one. The machine was listed as “running badly”. Not a problem — this is what I do.
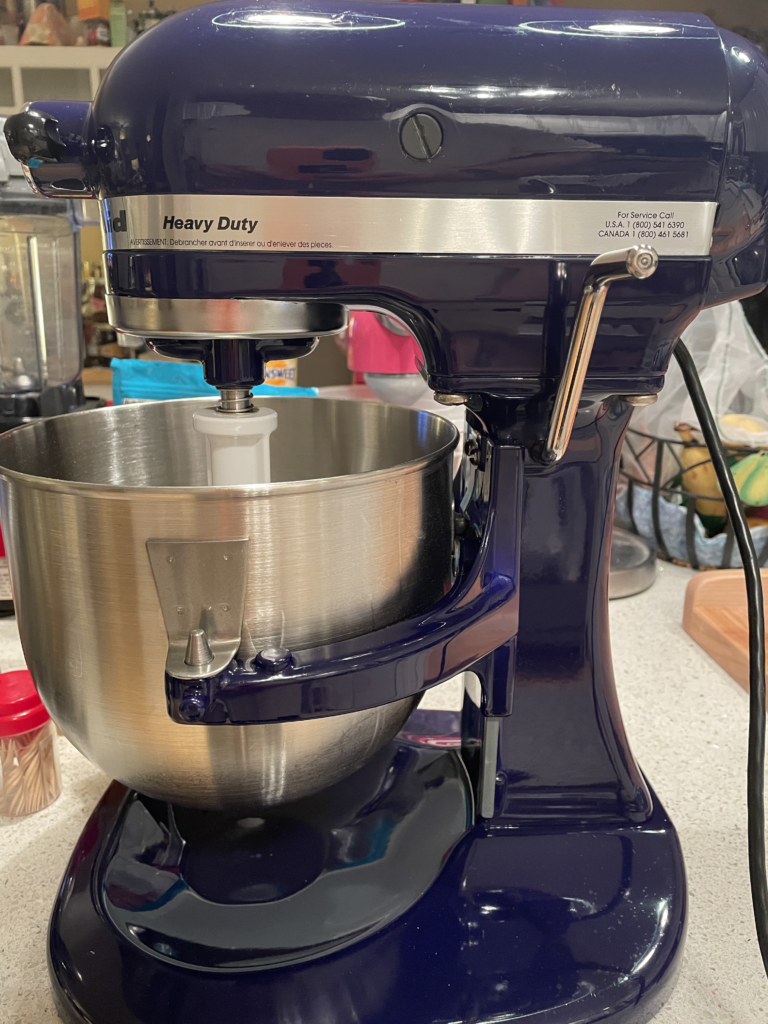
Then this beauty landed on the bench.
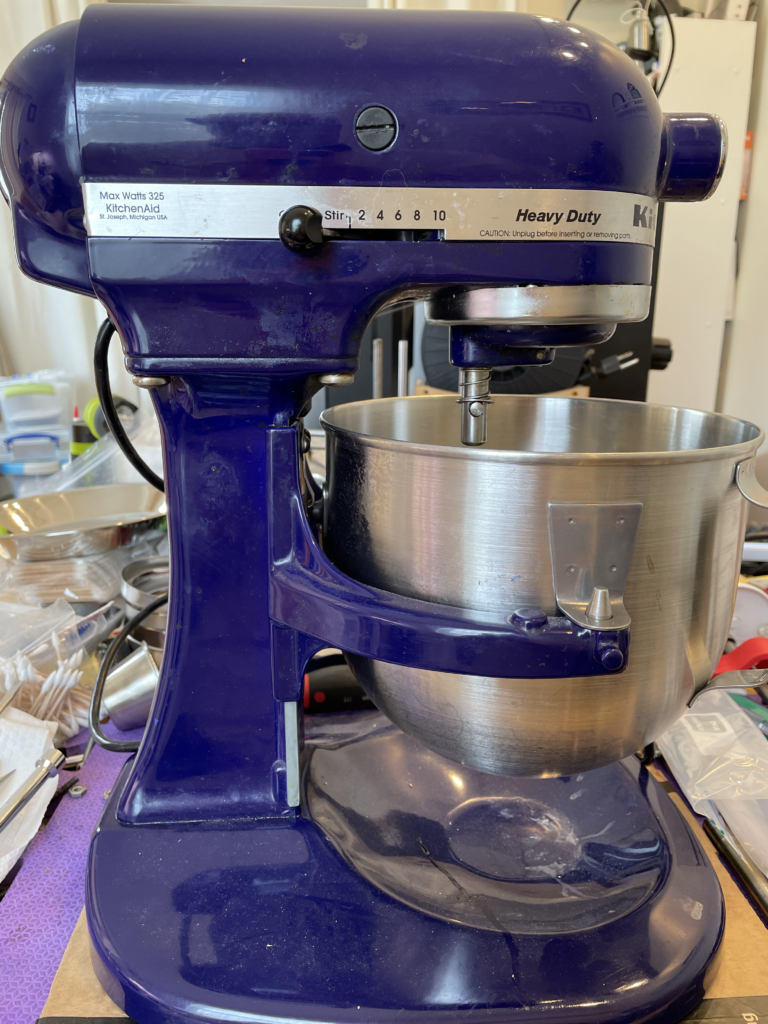
K5SS in cobalt blue, fresh out of the box.
And it did run badly. The motor bearings were shot, so I replaced them. That solved the running problem, and there on out it was a pretty straightforward refurb job. More or less. Except for the extensive amount of cleanup required; there was oil leakage everywhere.
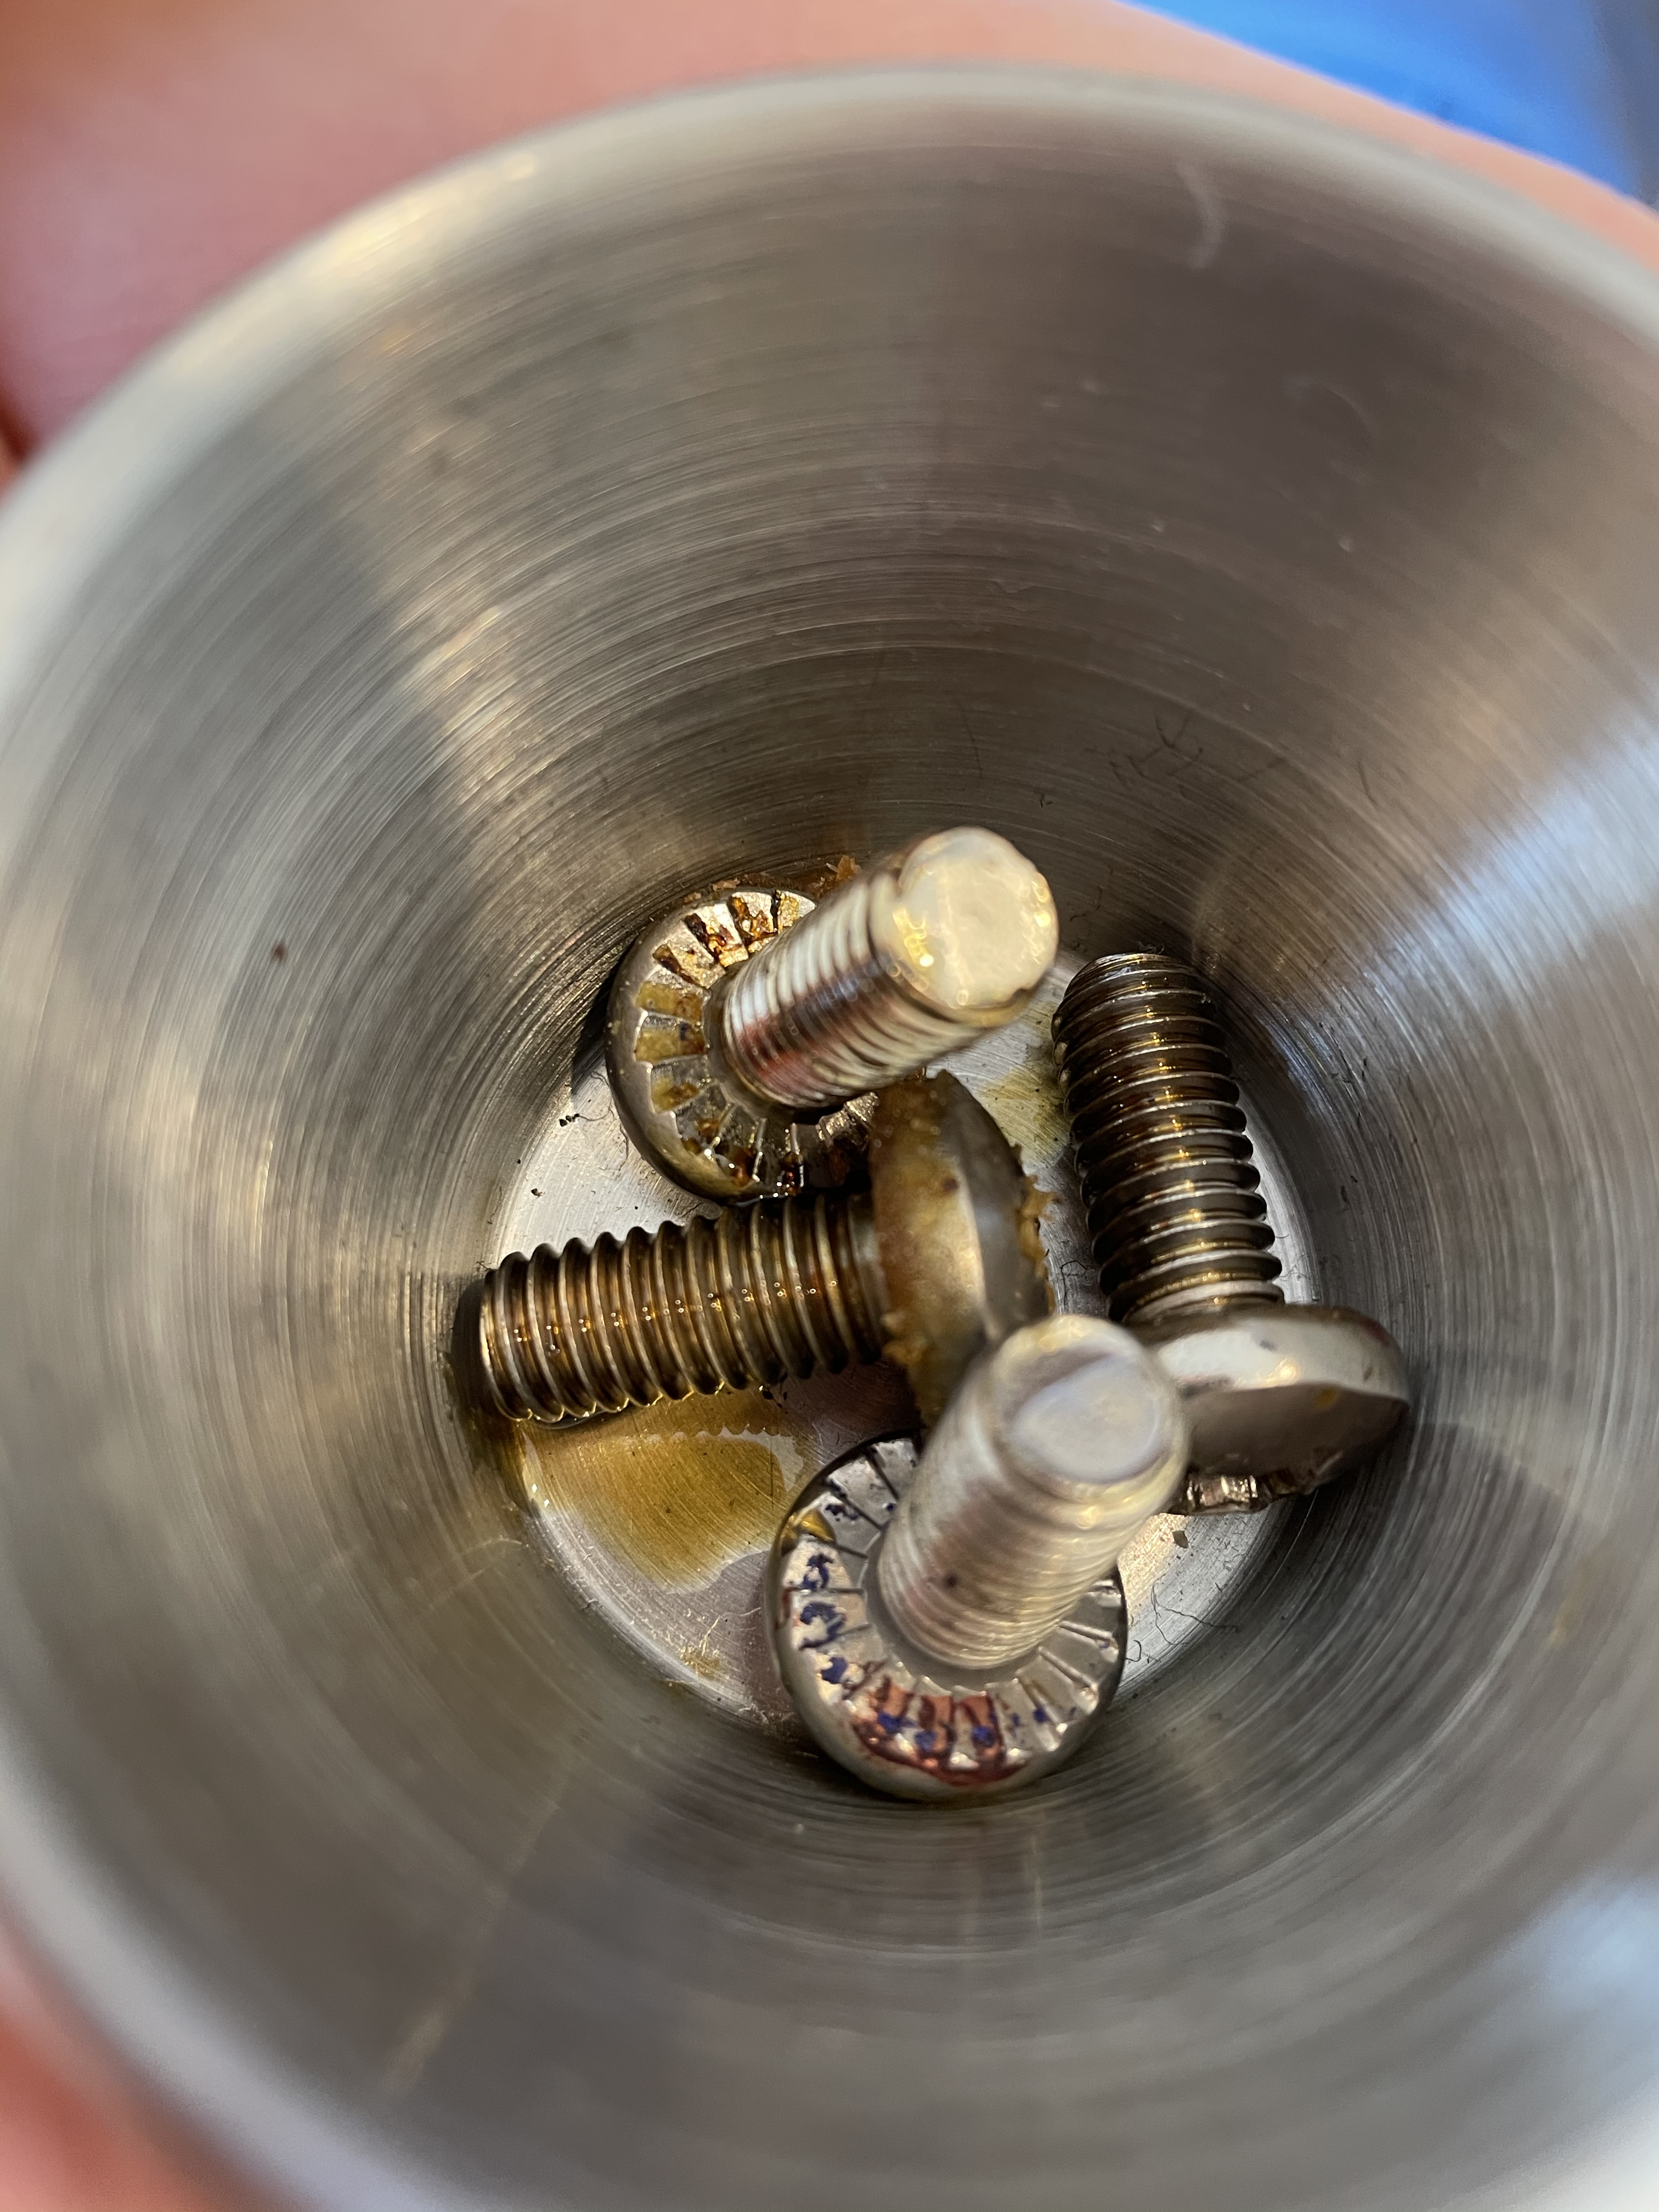
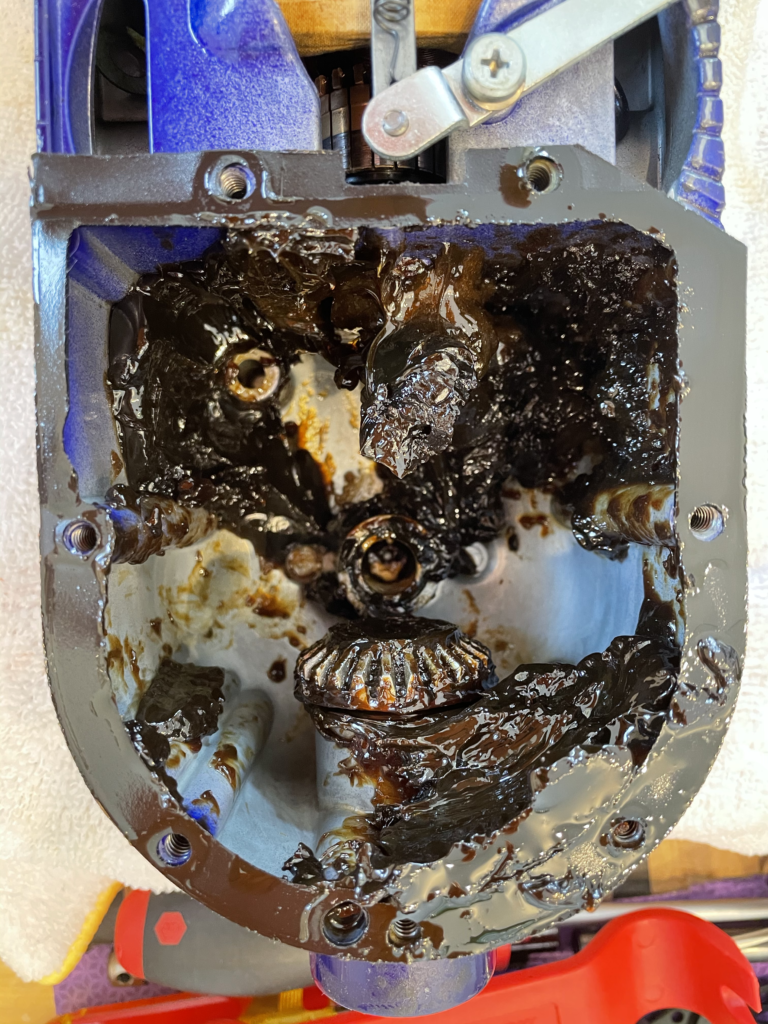
The gear case gasket basically wasn’t doing anything; all the oil leaked past it and wicked away to the far reaches of the machine.
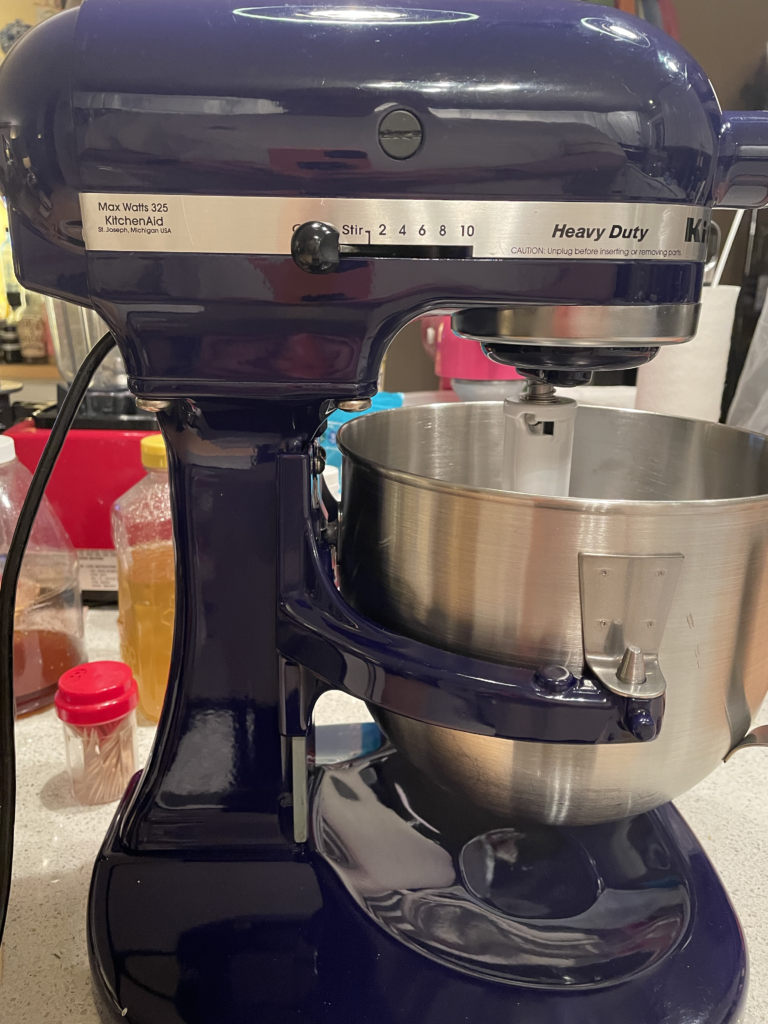
Cleanup took a long time, but it turned out really well.
Photos don’t really do justice to the color.
The machine didn’t come with anything but the bowl, so I outfitted it and sent it on to its new home. I’ve received reports that it’s happily churning away at making huge batches of heavy bread dough.
This machine (1997 K45SS) was in excellent overall condition, requiring only routine maintenance. Unfortunately, the head lock lever was bent in transit (the mixer tipped over and landed on it), but that was easily resolved with a replacement latch mechanism while the lower gear case cover was off.
After grease service, cleanup, and bowl base plate correction.
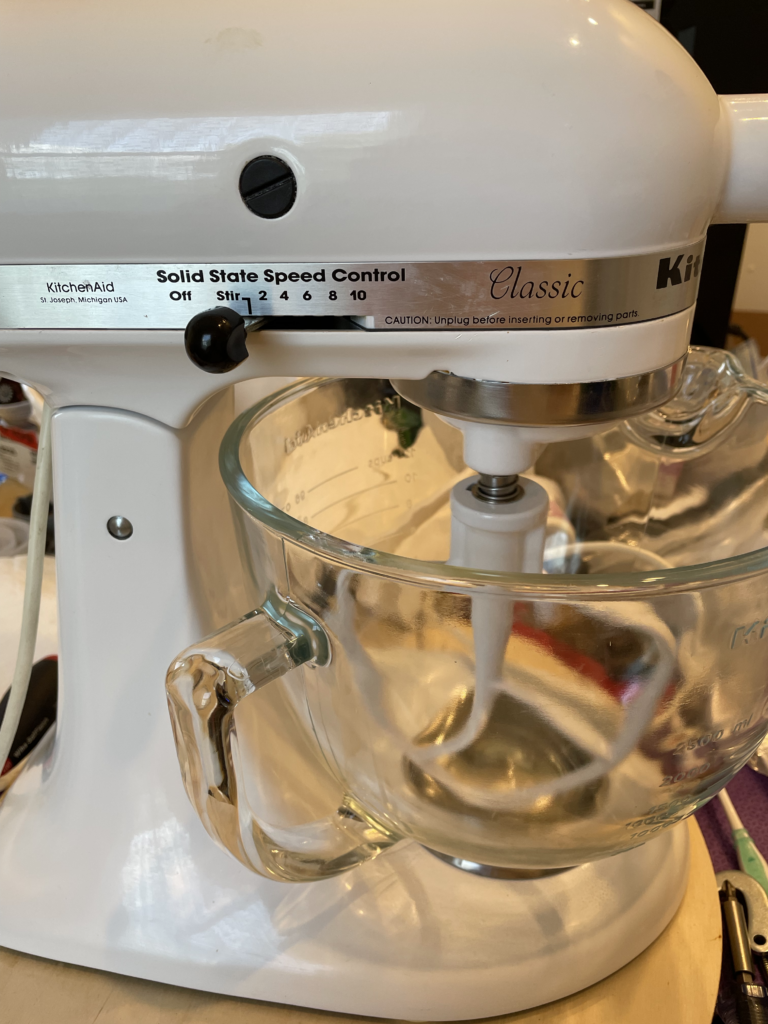
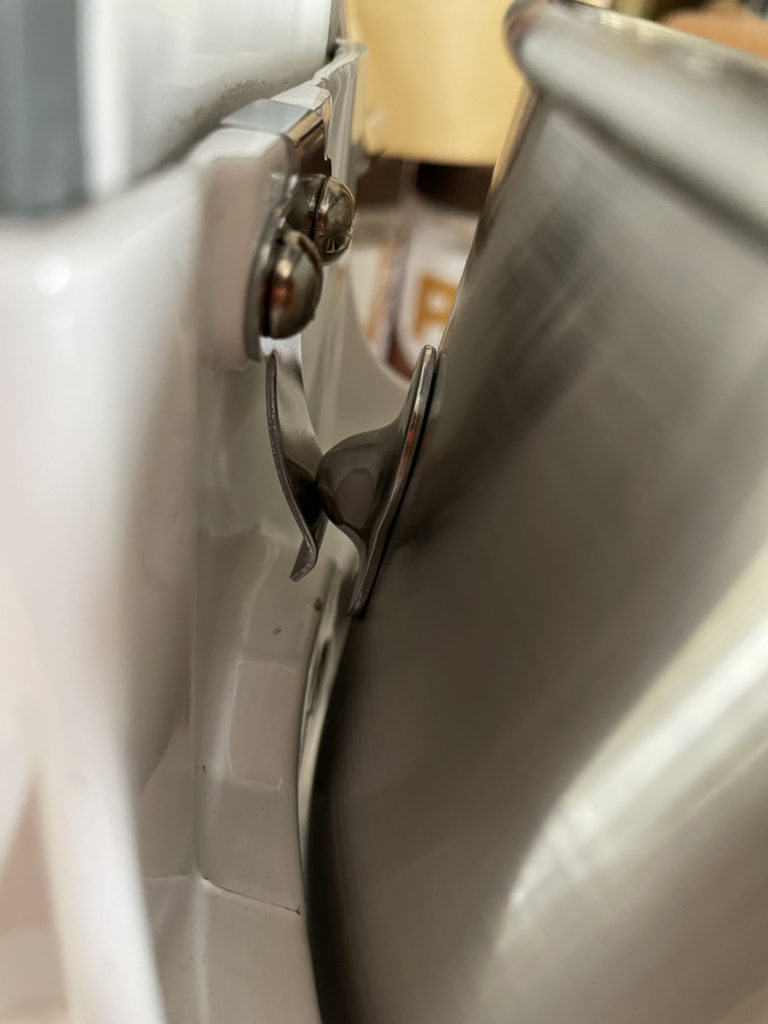
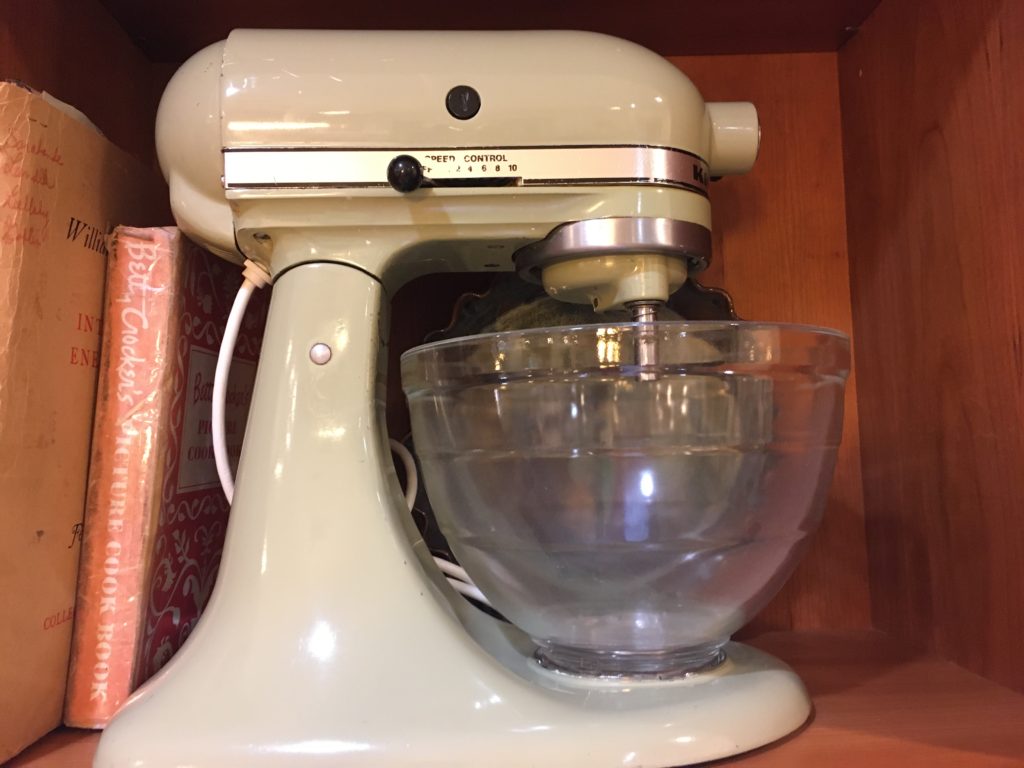
The owner had retrofitted the mixer with the 5-quart glass bowl. They were less than completely happy, though, because the bowl would only fit on the machine in one orientation, with the handle ending up inconveniently on the back side. (The photo above shows the bowl after adjustment.)
This was easily addressed by removing and reorienting the bowl base plate. (It wasn’t until the Artisan series that the glass bowl with the spout was available; on older machines the orientation of the plate was less important, because the factory bowl had no handle, or just the handle, and no spout.)
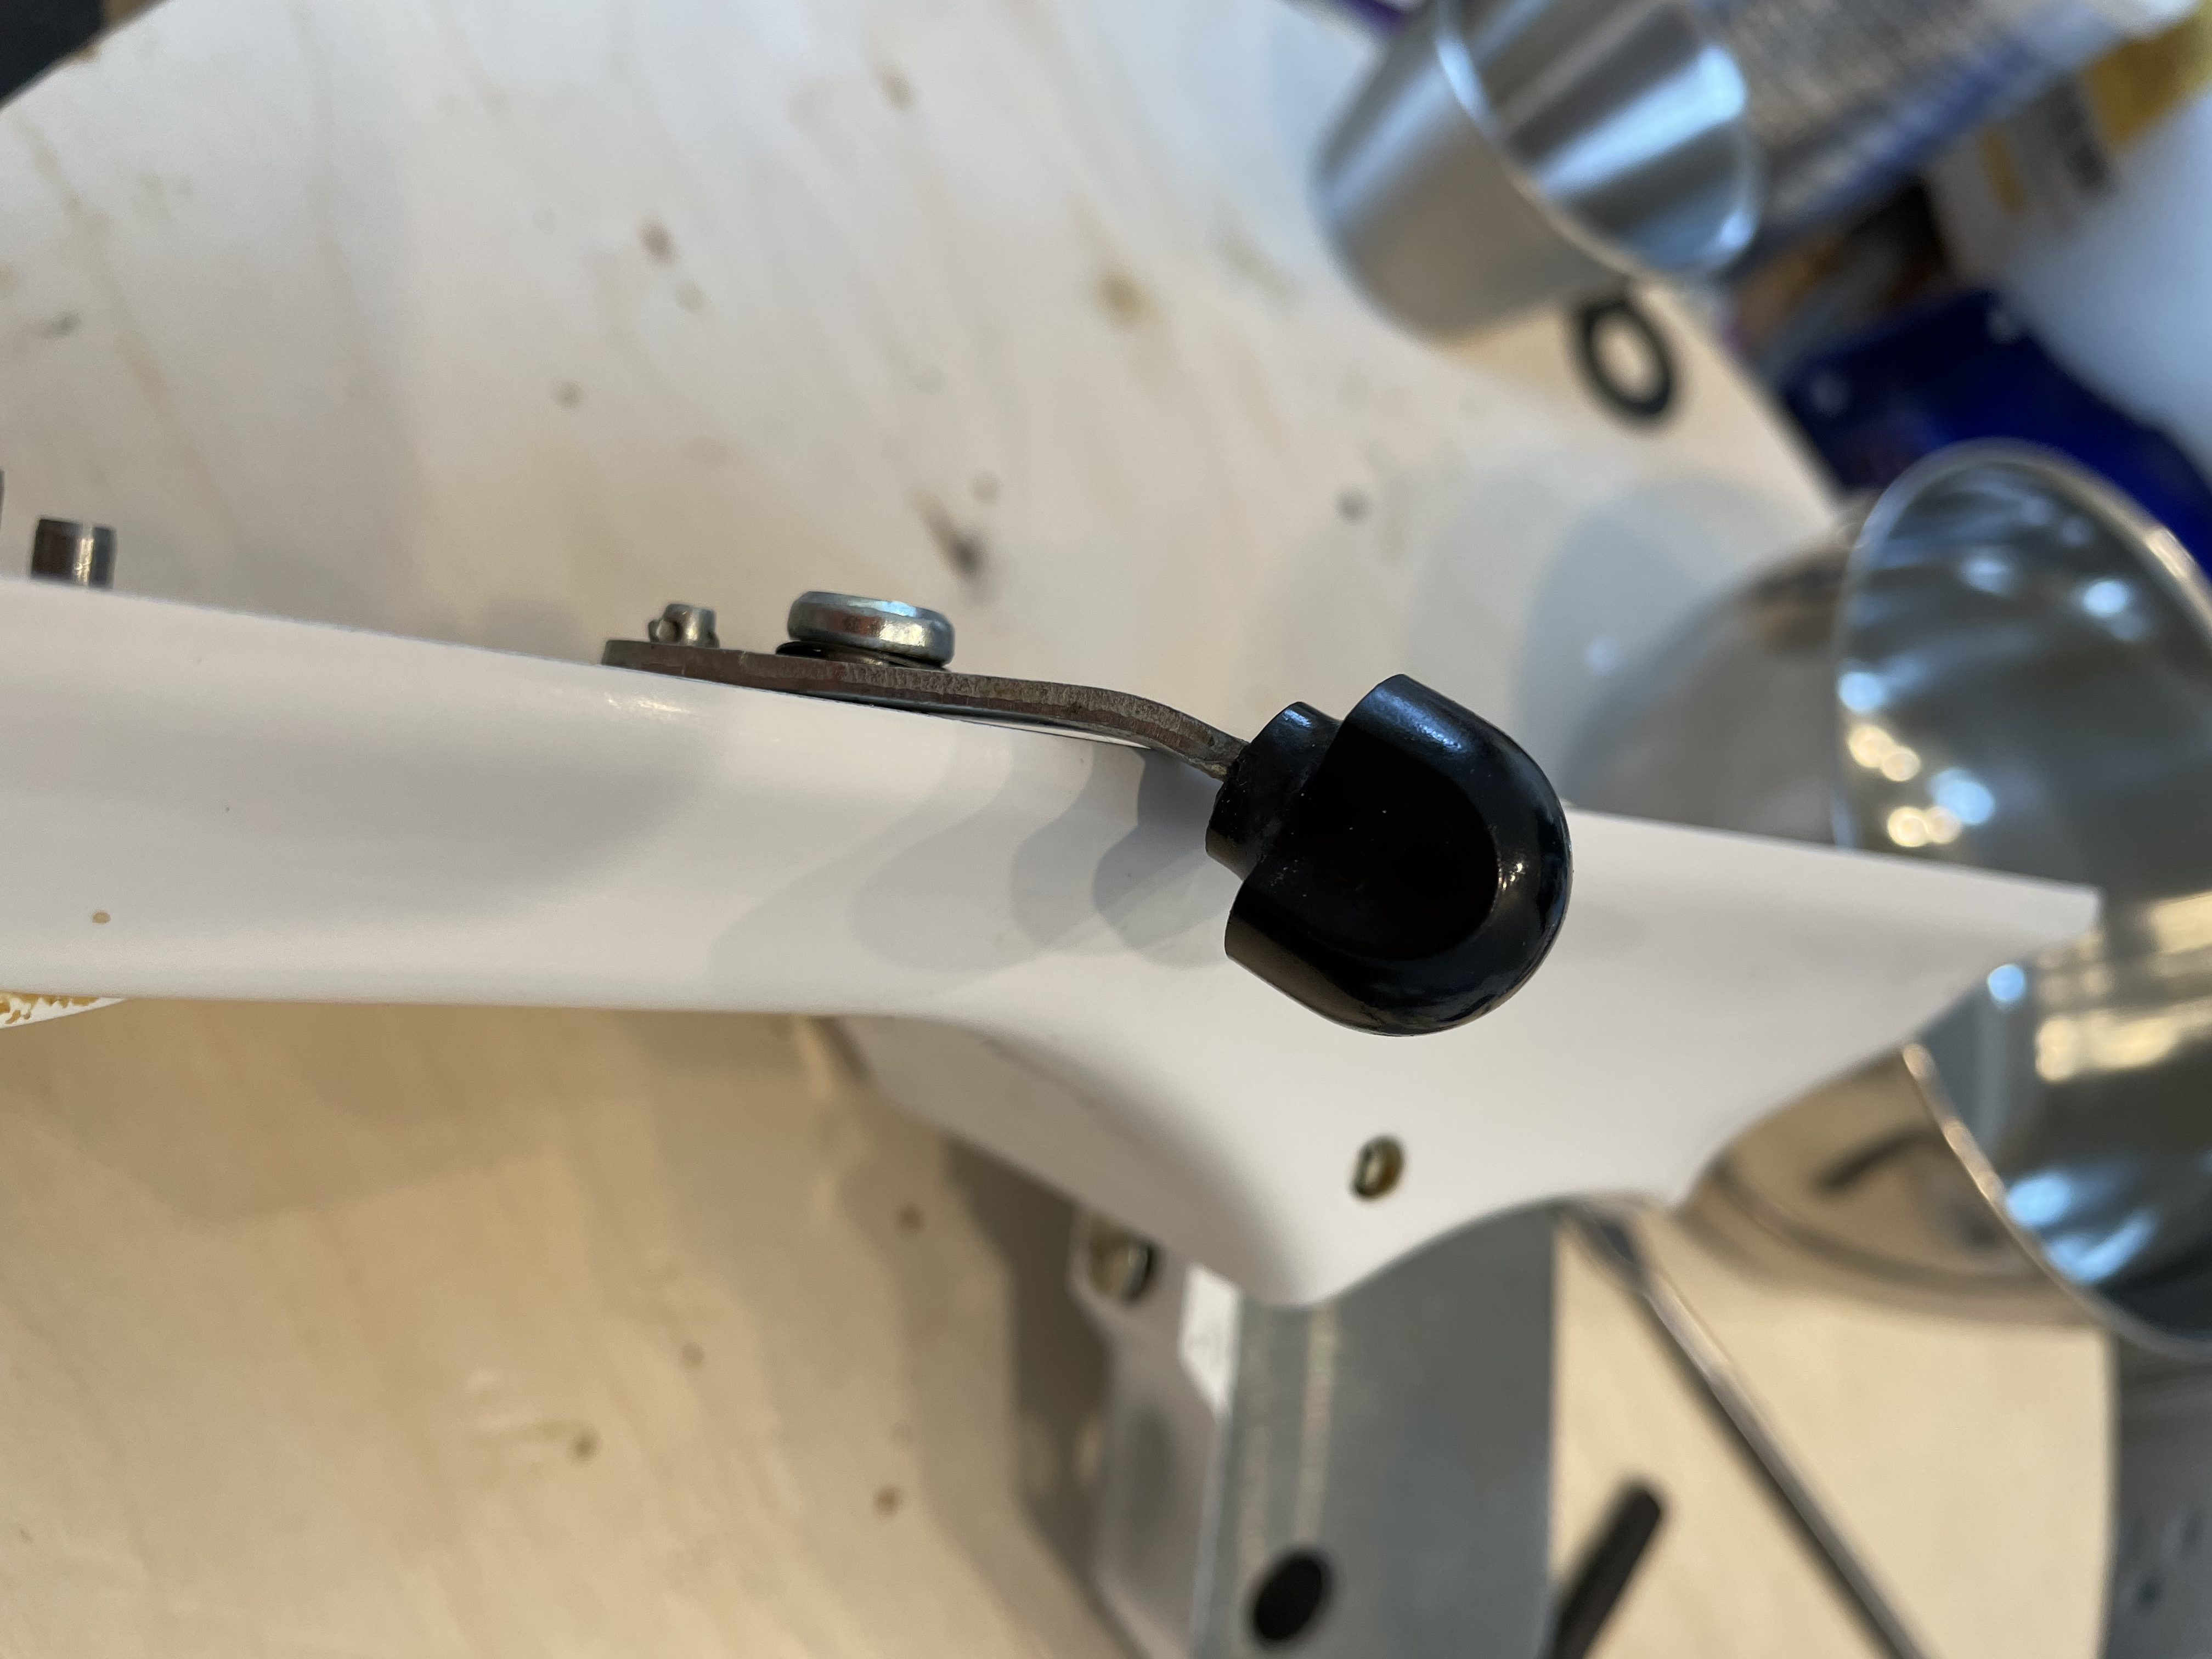
Fun fact: although KitchenAid sells just the lever as a part, you can’t actually replace just the lever, because the ends of the link rod are flattened so that the pieces don’t come apart inside the machine. So you have to replace the entire latch assembly. Dumb.
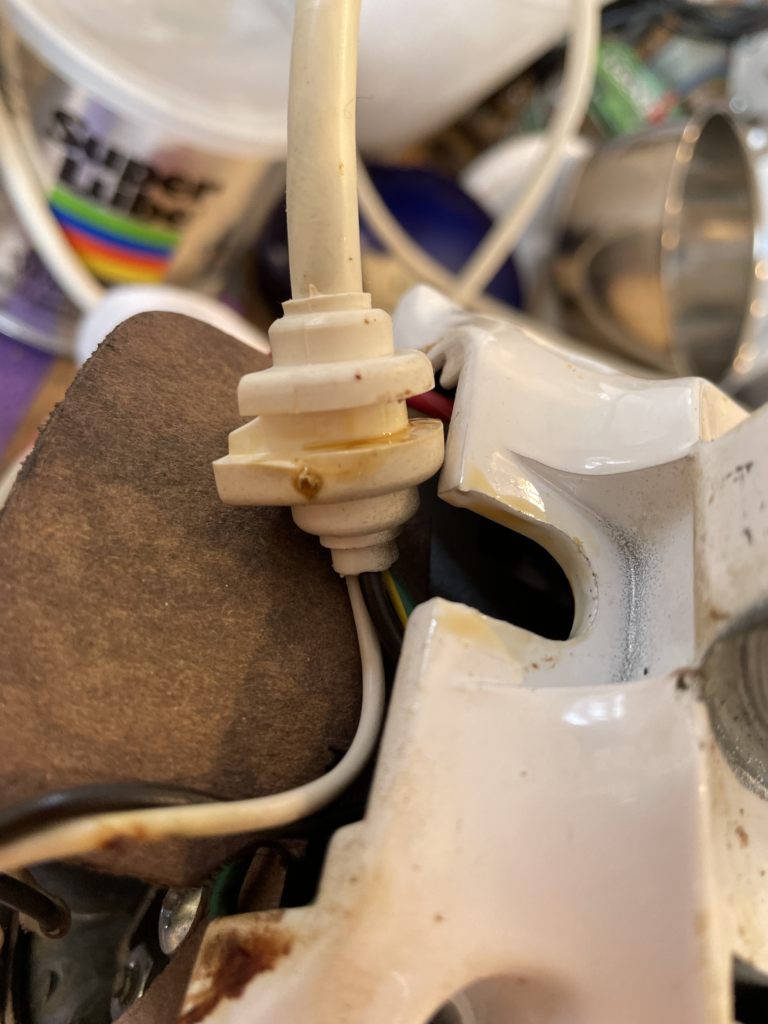
Otherwise the only other notable thing about this job was the quantity of oil that had migrated to the back of the machine. It actually made it all the way to the power cord strain relief.
Lots of oil leakage. The motor housing gasket was carrying plenty, as well.
Job done; another happy customer.
There’s a popular claim that modern KitchenAid mixers are specifically inferior to vintage ones because their “gears are made of plastic” (or a similarly phrased complaint).
This is a category error, in two ways.
First: all of the gears in full-sized tilt-head KitchenAid mixers, from a 60s-era K45, the 90s KSM90 “Ultra Power” or the modern KSM150 Artisan (and all the variants in between, but not the Artisan Mini or Accolade), are the same. This is also the same gearing used in the older bowl-lift models: K5A, K5SS, and KSM5/KPM5/KSM50/etc. (These mixers are all recognizable by having a round rear cover secured by a screw at the top.)
Second: “Professional”, “Pro Line”, “Commercial”, and bowl-lift models introduced in 2023 (KSM55, KSM60, KSM70) use all-metal gear trains of varying designs, discussed below. (These mixers are distinguished by having no separate rear cover, and a trim band secured by a single screw at the back.)
In these mixers, the main gear, accessory hub gear, planetary pinion gear (which makes the beater spin on its axis), planetary ring gear, and the drive pinion gear (which turns the main gear) are all metal. With maintenance and barring accident, they’ll last just about forever.
The worm follower gear in the K45/K5 design is a nonmetallic “sacrificial” gear which is designed to fail and protect the motor (and the other gears) if something jams the beater (or an attachment connected to the drive hub). This has always been the case, although the worm follower gears in very old mixers are made out of a different material.
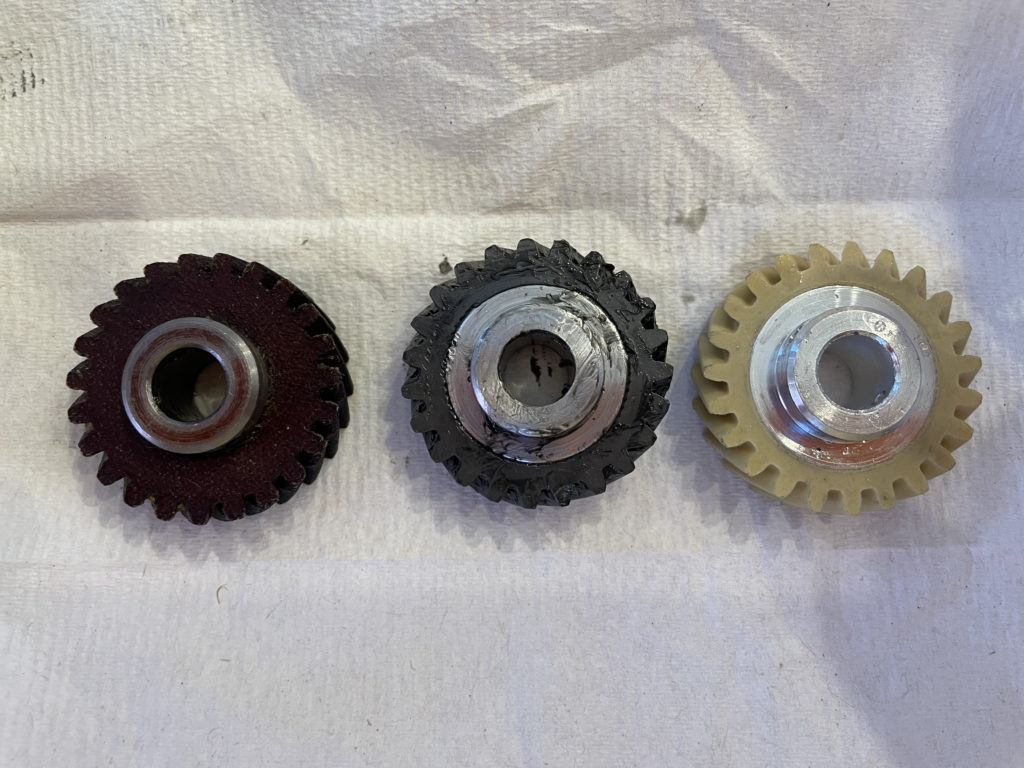
Worm follower gears through the ages. From left to right: 1950s-1960s, 1970s-1980s, 2010s. The gear in the center looks metallic, but isn’t.
In a mixer of sufficient age (or mileage), eventually the teeth on the worm follower will wear down enough that it starts to slip. However, a mixer needs to be very old or very hard used to get to that point. Still, it’s a good reason to inspect the plastic gear whenever you have the machine open for grease service (which you should do every couple of years, or more often if you use the mixer a lot or for heavy work).
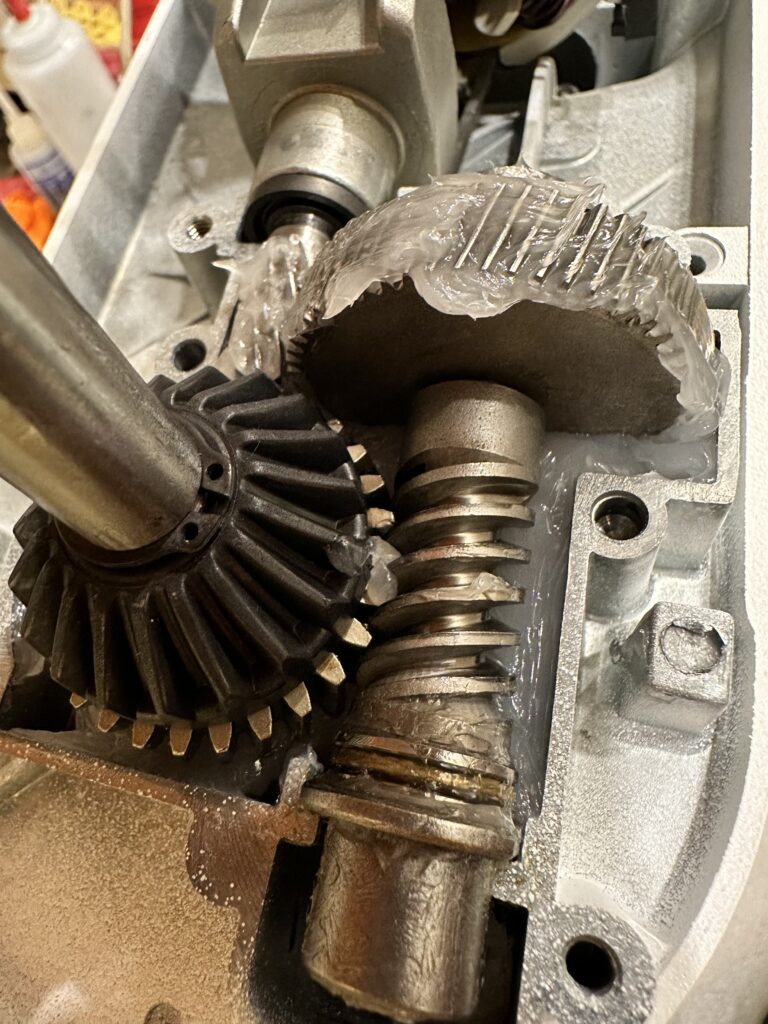
In the early days, the metal gears in the drive train were machined from blanks; they’re beautifully crafted shiny bits of metal. At some point in the early 80s (late-series Hobart production) they started using another process which isn’t nearly as nice but has no significant practical effect on the quality or performance of the mixer.
Original machined gear train, with modern worm follower.
All-Metal Gear Trains
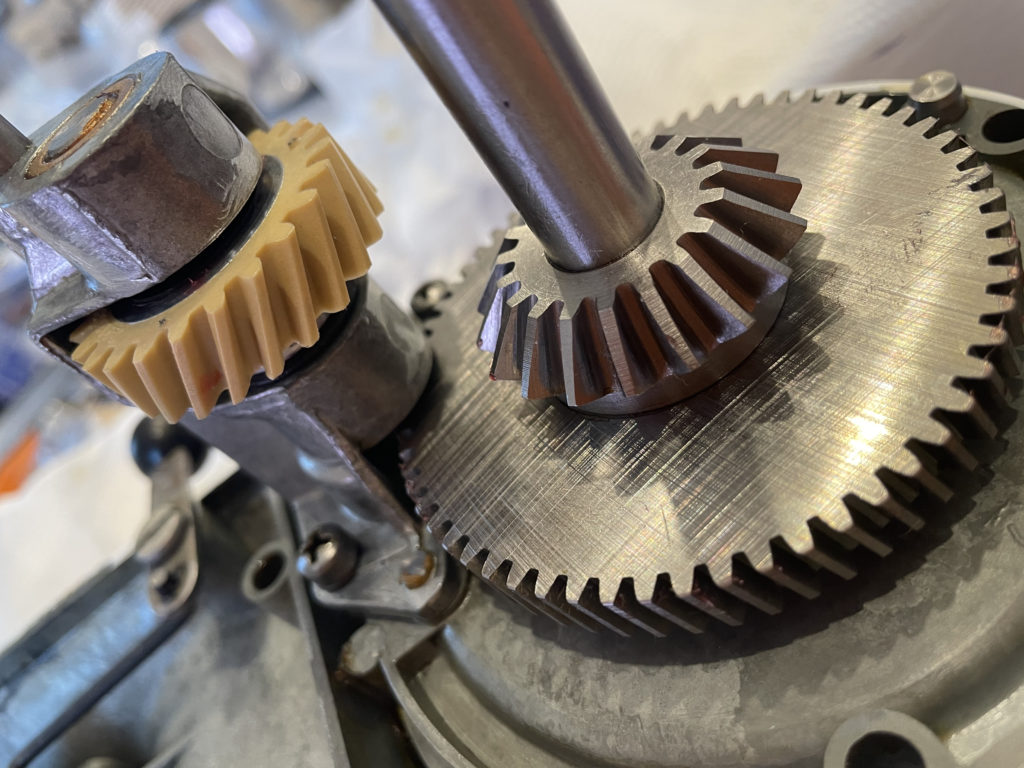
The “Professional HD”, “Professional 5 Plus”, “Professional 6”, and “Professional 600” model types (KG25, KV25, KP26, and a few others) use a different setup, in which the motor is a completely enclosed unit within the body of the mixer, and the motor shaft turns an enclosed transmission. The gears in the transmission are metal as well; and the worm gear follower is made of bronze. This allows the Pro series mixers to handle heavier loads; but the bronze gear is the “mechanical fuse”, and it too will wear and can fail.
Detail of KG25/KV25/KP26 gear train. The teeth of the bronze worm follower are visible beneath the black bevel gear to the left of center.
(Side note: using a metal worm follower does not make this model type intrinsically any more reliable. These are mechanical things, and with use they will wear and certain things will need repair.)
(Side note 2: early generations of this design used a plastic housing for the transmission, which was prone to failure. After 2005 or so Whirlpool switched to a metal housing for the transmission, but there are many mixers still in service using the original plastic housing. If your mixer has a plastic housing, it’s due for maintenance and at that time you should replace the transmission housing with the upgraded part. You’ll find more details on parts and materials here.)
The “Pro 6000HD”, “Pro Line”, “Commercial” 8-quart, and new bowl-lift models introduced in 2023 (KSM55/KSM60/KSM70) collectively use yet a different gear train design which is (as above) also comprised entirely of metal gears. These models use an integrated motor/transmission assembly which does not employ a “sacrificial” gear. This assembly is not field-serviceable or field-repairable; and there are no maintenance or repair parts available. If the gear train wears out or something in the gear train breaks, the entire drive assembly must be replaced as a single unit. (This is still less costly than a new mixer.)
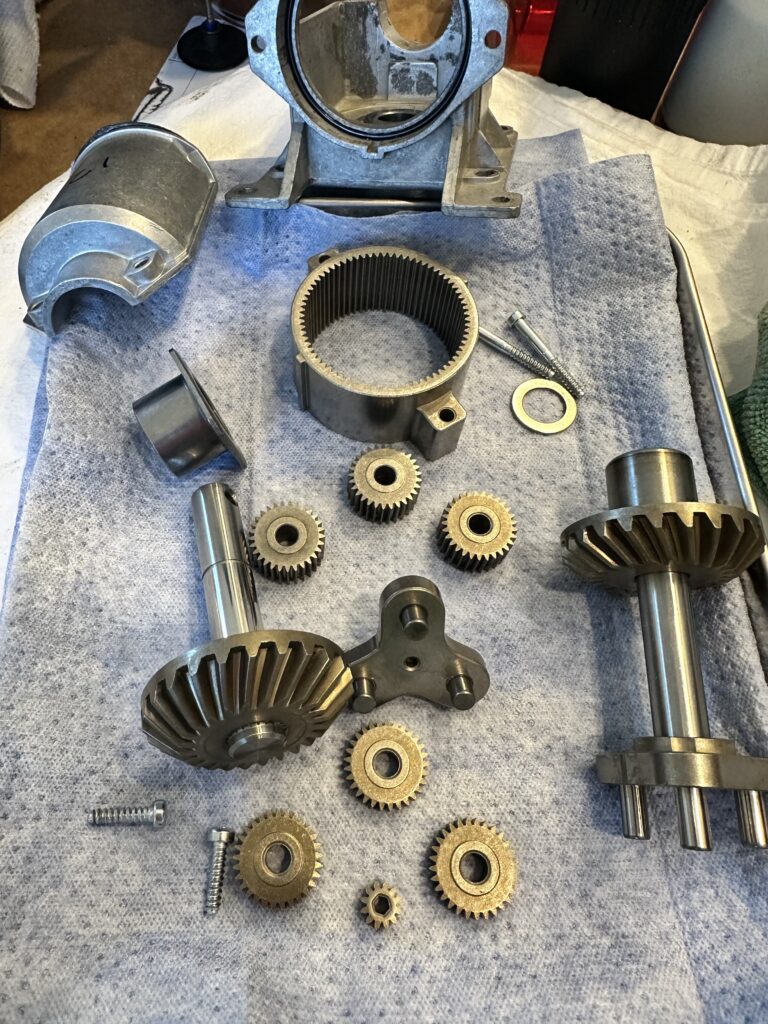
The disassembled gear train of a Pro Line/Commercial mixer.
So, in “Hard Luck Cases“, I mentioned learning a valuable lesson. When I got the mixer on the bench, I didn’t even plug it in to see if it ran. Once I saw its overall condition, with the corroded power cord, crud, and all the rest, I just started right in on disassembling it. As a result, I had no idea whether it actually ran.
The first thing I did was remove the motor brushes. There was no particular reason to do this — at the time I wasn’t planning on disassembling the motor at all, and the brushes can stay in unless they’re worn out.
This was a mistake.
After many hours of disassembly, cleaning, and reassembly, I plugged in the brand-new power cord and moved the speed control to “Stir”.
Nothing.
Checked everything. Measured voltages across the speed control plate. Fine. Swapped in a new phase control board. No change. Completely disassembled the motor (which involved emptying the gear case so that I could remove the armature, which has to be driven out through the accessory shaft hole). Measured resistance across the field coil and armature. Both OK. Since I had everything out I also replaced the brush holders, which were in rough shape.
Somewhere in the middle of all this, my brilliant wife asked: “Did you switch it on before you took it apart, to see if it ran at all? I always do that when I put a new sewing machine on the bench.” Reader, I had not. And she’s absolutely right: I should have turned it on to make sure it ran. Otherwise, I’d have some idea of whether it should have run after I reassembled it, or not. It was a n00b mistake.
Back to debugging.
As I was reassembling the mixer for the SECOND time (the armature needed replacement), I noticed (since I had the head off and upside down) that the motor brushes weren’t making contact with the armature.
🤦♂️
So here’s what happened: when I put the motor brushes back in after the initial removal to inspect them, I didn’t think to check their orientation. Each brush has a chamfered edge, which lines up with a tab in the brush holder. If these don’t line up, even though it *feels* like the brush is all the way in, it won’t make contact with the motor armature. So there’s no completed circuit, and the motor won’t run. Of course, the tab is deep inside at the far end of the brush holder, so you can’t tell without looking very carefully.
This is a “feature” of modern KitchenAid mixers that use this motor design; vintage mixers use a square brush holder. I’m sure they had a good reason for wanting to change the brush holder and I can probably come up with a couple of reasonable explanations. That being said, it’s a trap for the unwary.
So, two takeaways:
Always turn the mixer on when it lands on the bench, to make sure that it runs. If it doesn’t, you know you’ll have to figure out why. If it does, then it should also run after reassembly.
If the mixer won’t run after reinstalling the brushes, check the brush orientation. Vintage or modern, it’s important to make sure that the curve on the brush head lines up with the curve of the armature; but in a modern mixer it’s also crucial to line up the chamfered edge of the brush with the tab on the brush older.
*There’s almost never a need to remove the motor brushes, unless you’re planning to completely disassemble the motor.
(And yes, especially on a very old and/or high-mileage mixer, inspect the brushes for wear. If there’s less than about 3/8ths of an inch of graphite left, they should be replaced.)
(* It’s often said that the two most difficult problems in computing are naming things; cache coherency; and off-by-one errors.)
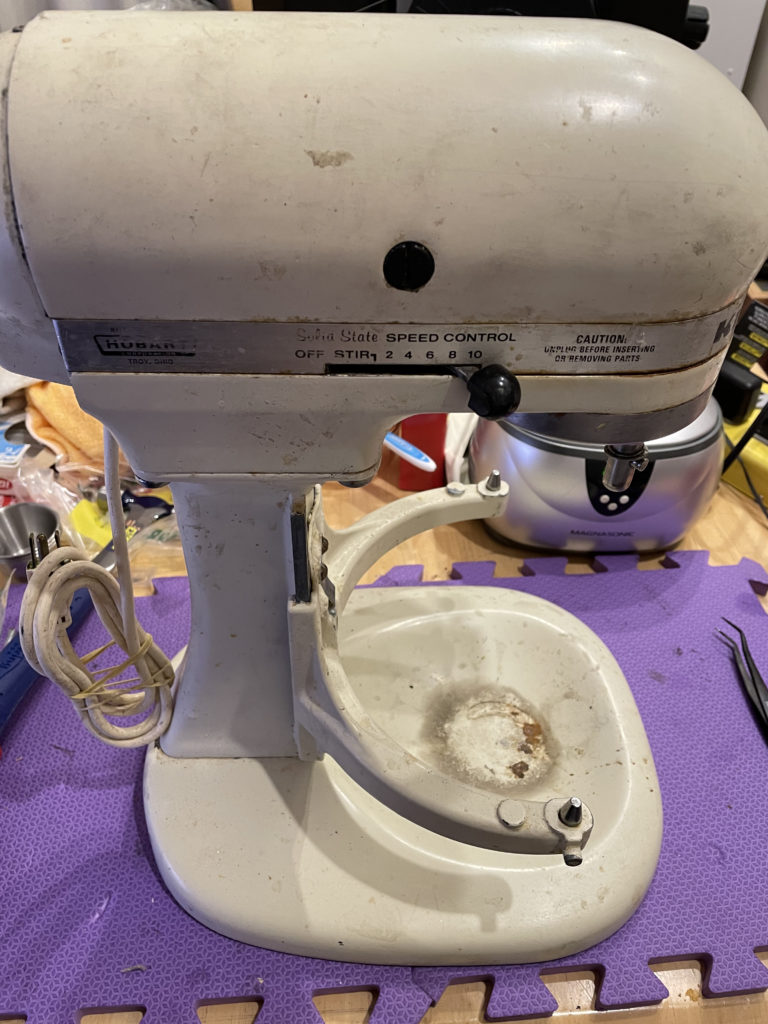
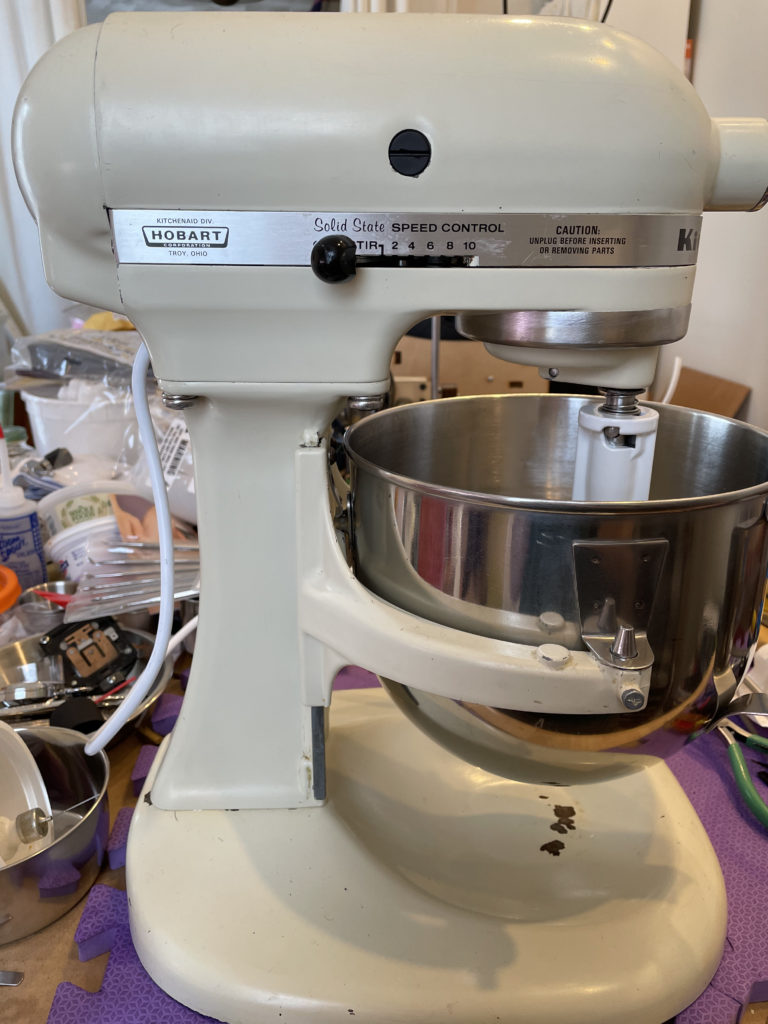
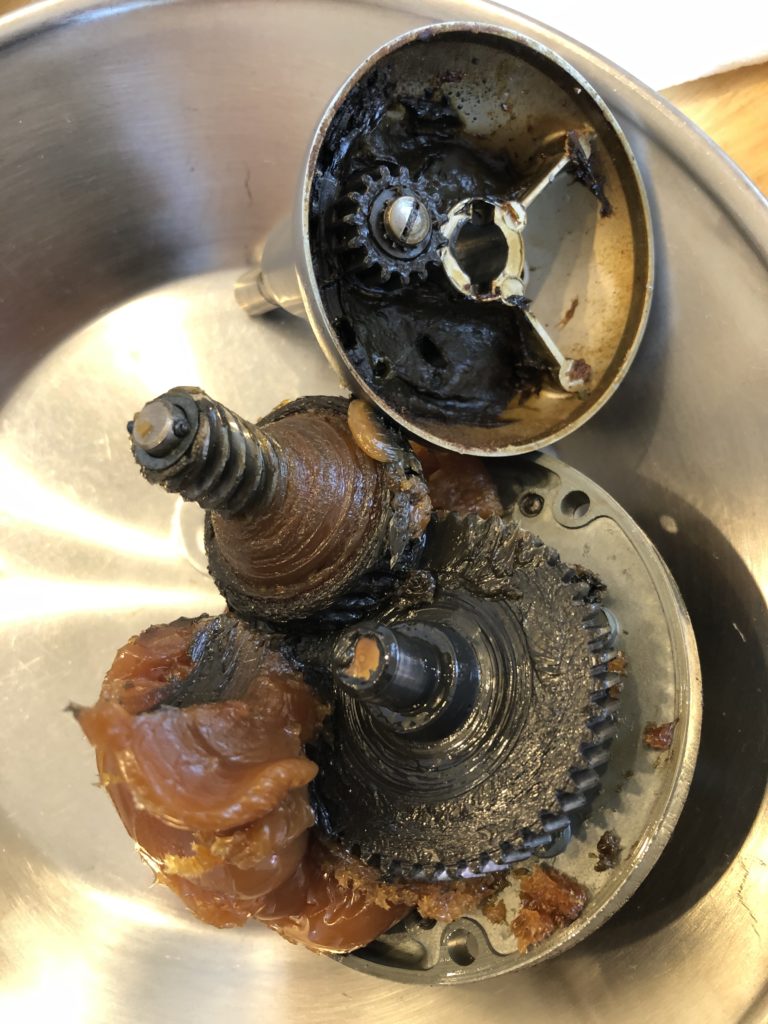
“Rusty” was another Goodwill find, a Hobart-era K5SS (bowl-lift, solid state speed control, 5qt bowl). This classic needed almost as much work as I’ve ever put into a mixer. Most of the time spent was just on getting through the layers of crud so that I could disassemble it and perform the necessary service. (I also learned a valuable lesson along the way, but that’s a story for another time.)
On top of the wear consistent with many years of hard use, this machine also had rust and corrosion in odd places. There must be a story, but the best I can come up with is that maybe it was stored in a damp garage for a long time. The characteristic wear mark under the bowl is rusty, and there was rust underneath the base; and the screws underneath securing the column were rusted in place, and wasn’t that fun.
Condition on arrival.
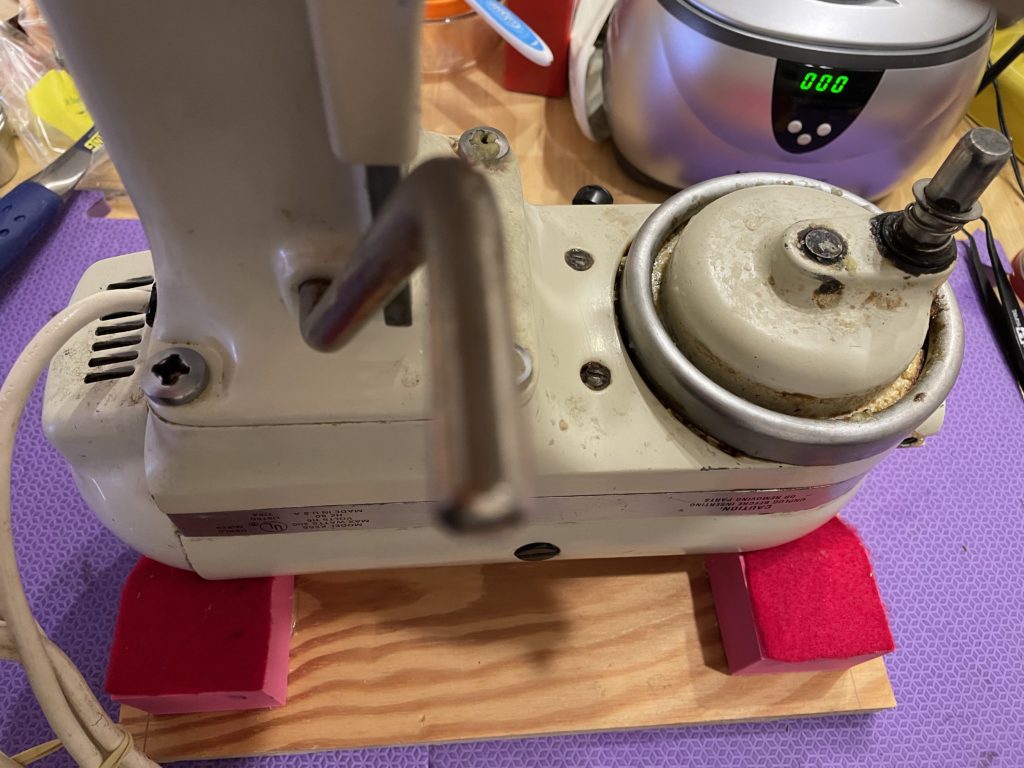
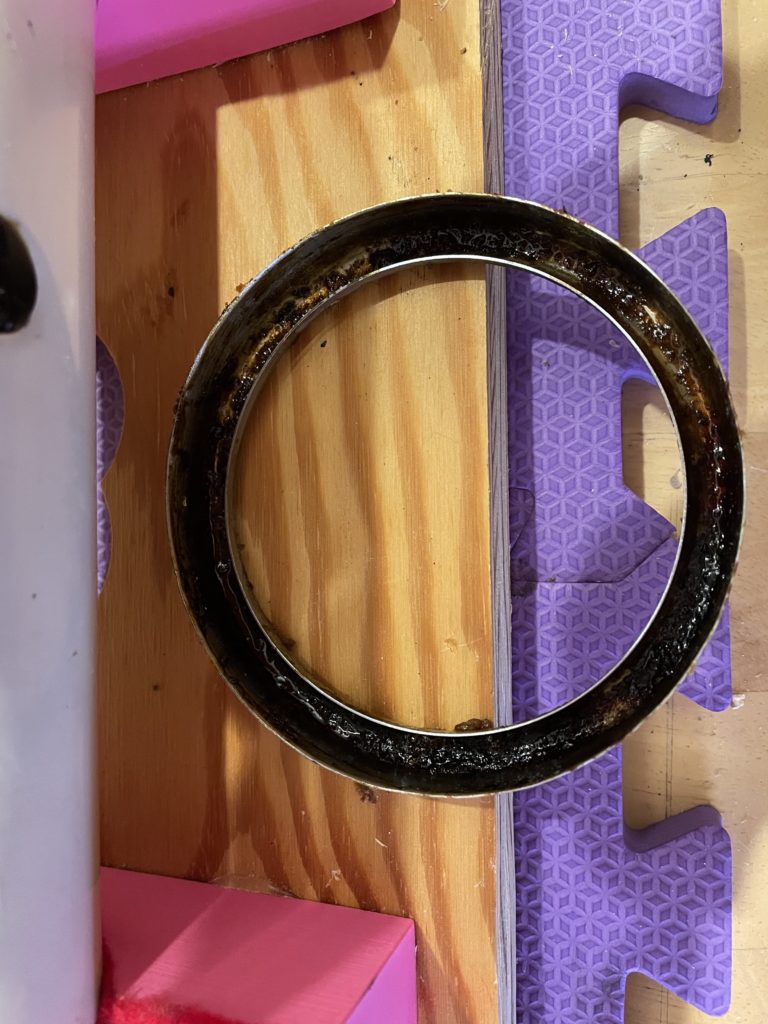
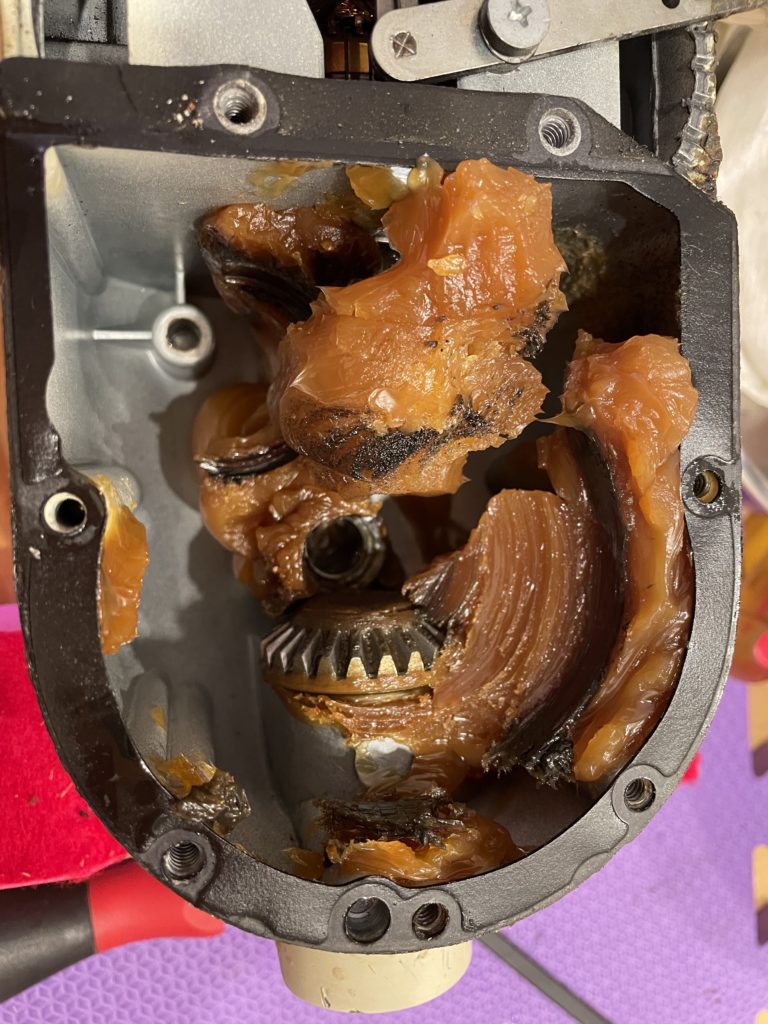
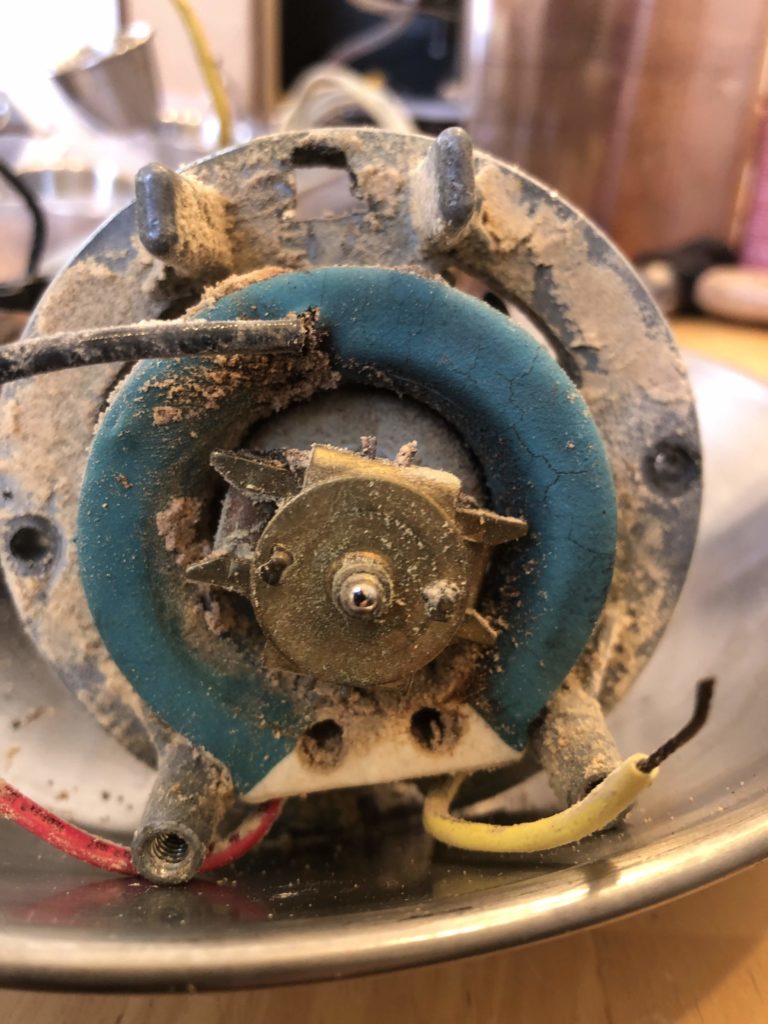
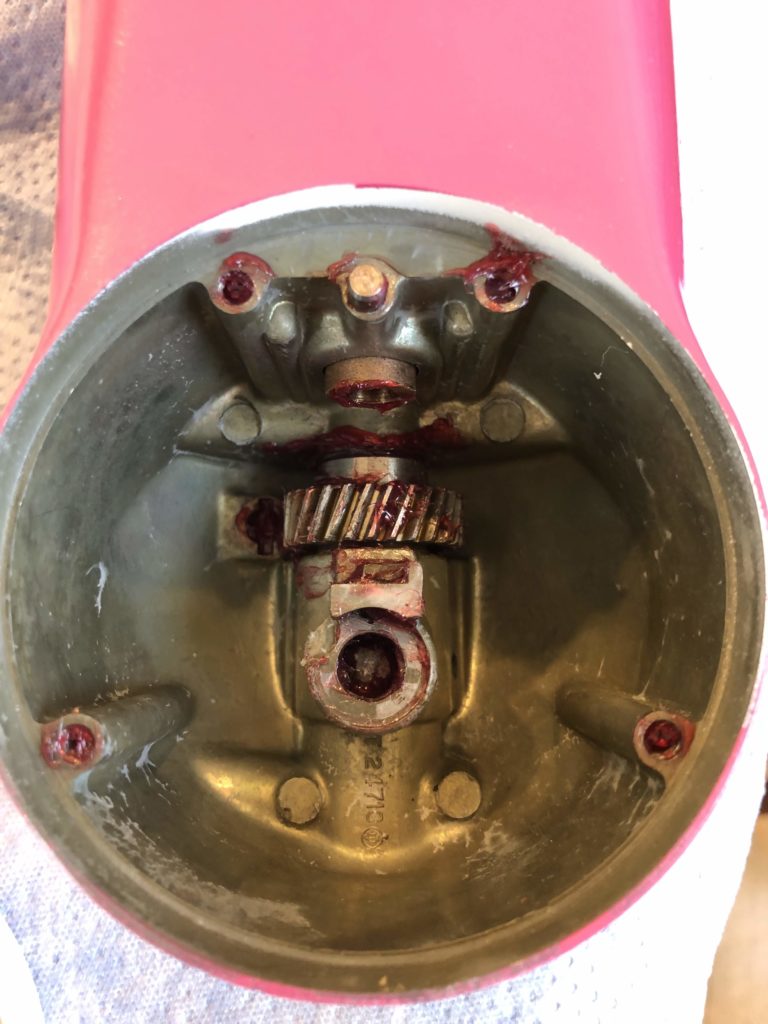
Inside, the gear case was in the condition you’d expect, with lots of old grease. The gears were factory-original, though, and apart from some irrelevant surface pitting, were fine.
Typical old-mixer stuff: crud in the drip ring, polymerized grease in the gear case.
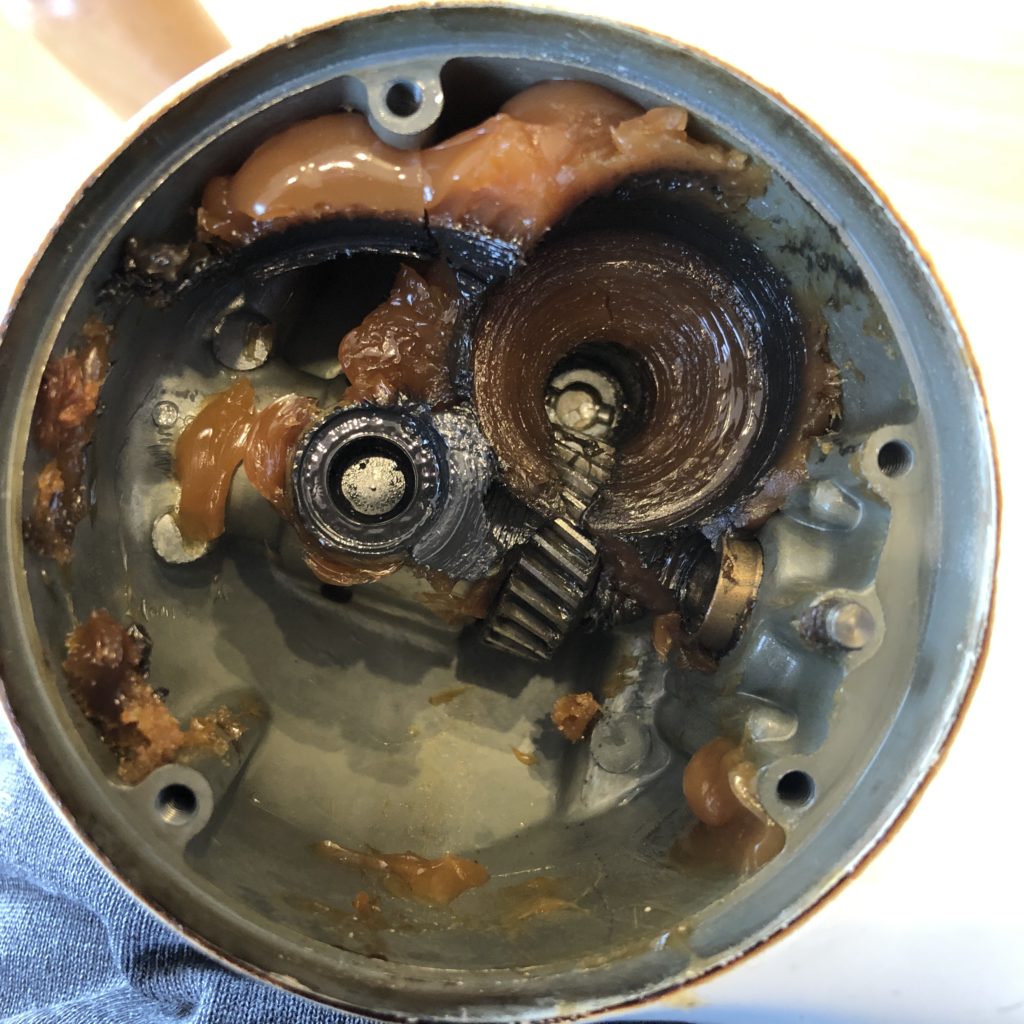
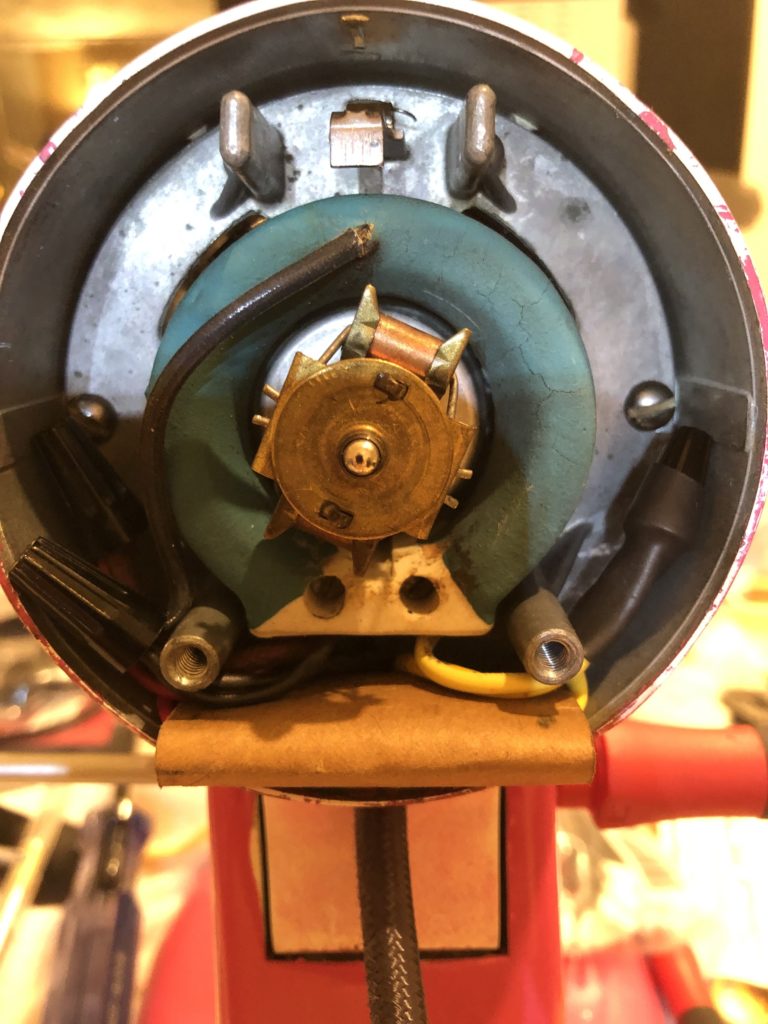
The real challenge in this mixer was the motor. One of the nuts that secured the rear armature bearing bracket was missing. I replaced it, and found that when the bearing was properly secured, the motor wouldn’t turn! Oops. (There has to be another story there.) Time for a complete disassembly.
Out came everything: gears, bearing bracket, field coil, armature, all of it. Cleaned out the inside of the case, cleaned and re-greased the armature bearings, put it back together, no joy. Argh.
Did it all over again, because you can’t take the armature out without first emptying the gear case. This time I replaced the armature. (Most of the modern parts will work in old mixers; some of these designs haven’t changed in sixty years.)
Back together again, and now the armature spins like it should. (I still have the old one; I suspect the shaft is bent.) But the motor won’t keep a steady speed. Adjust the timing so that it’s correct from power-on, and it creeps. Wait for the speed to settle, adjust for correct RPM, and it stalls trying to start up. Can’t win.
“When you have eliminated the impossible, whatever remains, however improbable, must be the truth.” All that was left to replace was the motor governor, which is this crazy-looking little contraption that sits at the rear end of the motor shaft and helps regulate the speed. So, I replaced it. (Fun fact: I swiped the governor off an old 4C I had on the bench at the time.) Worked perfectly.
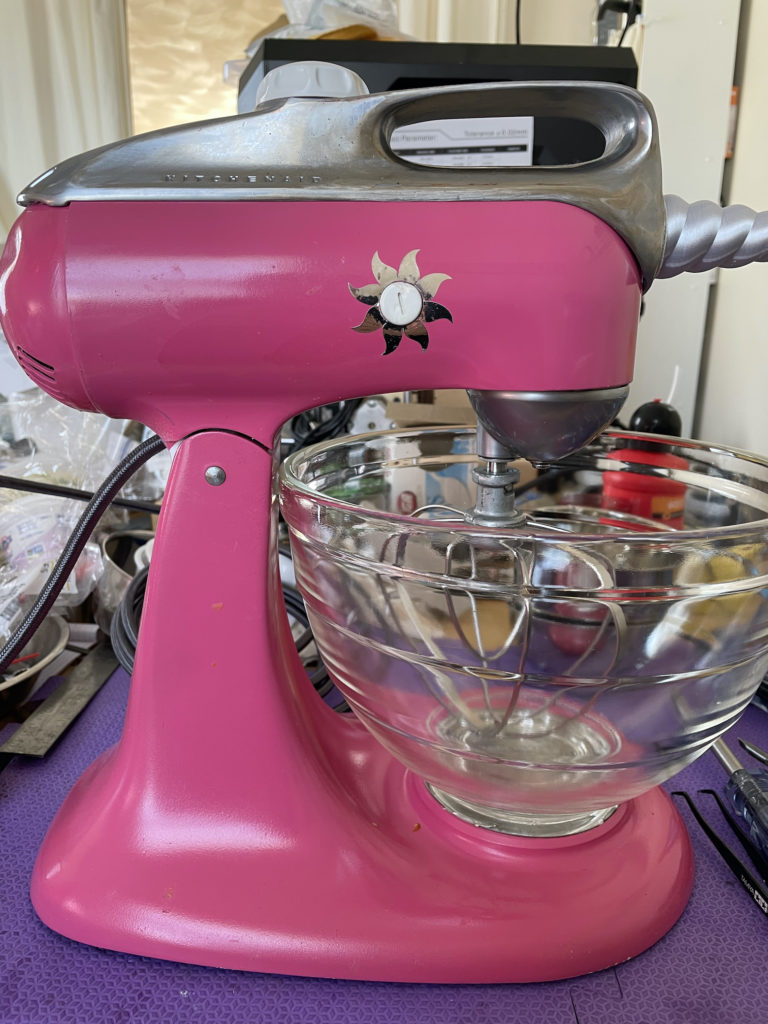
After repair and cleanup. That’s the original bowl, which is all it came with. Current-production attachments work just fine.
This is why it’s a hobby, not a business. I think I spent more on parts to make this thing run like new than I paid for it from Goodwill. The list of parts I replaced fills most of a page. I didn’t keep track of how many hours it took to get it back to working order and half-decent appearance.
But all that doesn’t matter; it’s a classic from before Whirlpool bought the consumer appliance line from Hobart. They don’t make ’em like this anymore. So it was worth it. And this is one less mixer that’ll be taking up space in a landfill somewhere.
Not a big fan of that color, though.
Here are some tips to help keep your bowl-lift KitchenAid mixer in dependable working order.
Keep it Clean
After each use, unplug the mixer. Then clean it thoroughly using only a soft damp (not wet) cloth and very light pressure. If there’s anything sticky that won’t wipe off easily, you can use a little dish soap on a damp sponge, but take care to keep water out of the mixer, especially around the lever slots. Clean everywhere, including the back of the mixer around the power cord. Pay special attention to the underside of the “head”, the planetary, and the beater shaft. You can use a microfiber cloth or a soft dish towel to dry everything off and keep it shiny.
Every few uses, carefully flip the machine over (use a soft towel to protect the head) and wipe the underside of the base clean (again with a damp cloth). This keeps dust, flour, etc from accumulating there, which attracts moisture that in turn cause rust and corrosion.
While the machine is upside down, inspect the feet and wipe off any accumulated crud. If the feet are dry, cracked, or hard, replace them. (They pull off, and you can get replacements directly from KitchenAid or on Amazon.) This will make the mixer less likely to “walk” around the counter (or off the edge).
Routine Maintenance
If you have a Professional 6000HD, Pro Line, Commercial, or any of the bowl-lift models introduced in 2023 or later, disregard the rest of this section. Those models use an integrated motor/drivetrain assembly which is considered maintenance-free, and there are no maintenance or repair parts or procedures. Once every few years you can remove the planetary, clean any buildup off the ring and pinion gears, and apply a small amount of food-safe grease.
Otherwise, if you use the machine more than once a week, and/or use it for heavy loads such as bread dough or for extended high-speed operation, or if you make if you use the mixer to make money, I recommend that you have the gears cleaned, regreased, and checked annually. This will keep the moving parts in good operating condition, and will give you a chance to catch any problems before they get really bad (and expensive to fix).
For typical light-to-moderate household use, I recommend that you do this every three to five years. You can find a list of parts and materials for the job here (depending on model type):
K5-A, K5SS, KSM5, KSM50, and other K5-type models which use a round rear cover with a screw on top: K45/K5 Clean and Re-grease Parts
No matter what schedule you follow, if at any time you see oil leaking down the beater shaft, or out around the trim band, it’s time to service the machine.
Store the Accessories Separately
It may be tempting to leave a frequently used accessory on the beater shaft even when the mixer isn’t in use. If you do this, the standard accessories (flat beater, dough hook, or wire whisk) will get galvanically welded to the beater shaft and you’ll have an extremely difficult time removing them. (This won’t happen with the stainless accessories, but it is still possible for rust to form on the beater shaft and create problems. So if you have stainless accessories, store them separately as well.)
You can store the accessories in the mixer bowl, or in any convenient location that isn’t the beater shaft.
Keep the Spring Springy
When you’re not using the mixer, let the bowl rest gently on the bowl spring — don’t snap it in. (You can also store the bowl separately from the mixer, if you have the space.)
This lets the spring stay relaxed when not in use, which in turn maintains its shape and helps it grip better.
Are you finding that the bowl pops out of the lift, especially when you’re making a heavy dough? First, check the screw(s) and make sure that they’re tight. (The Pro series uses a single screw, and older model types use two.) If the screws are tight but the bowl is still popping out under load, it’s probably time to replace the spring.
The KitchenAid part number for K5-type mixers is WP3182857 and it costs about US$5. (Note: if you have a Hobart-era K5SS, this part will not fit. You could modify it by grinding off the top above the screw holes.)
For the newer bowl-lift models (which use a single screw to secure the clip), the part number is WPW10504114 and the cost is about the same.
Keep an Eye on it, Always
While the mixer is running, give it your full attention. An unattended mixer is like a toddler: capable of creating amazing amounts of mayhem if left unsupervised. A running mixer can move, leading to excursions over the side of the counter and costly damage to the mixer and/or floor.
Observe the Speed Limit
KitchenAid recommends using speed “2” when kneading with the dough hook. Lower speeds won’t apply enough force to develop the gluten; higher speeds will significantly shorten the interval between maintenance and repairs, and are likely to cause premature component failure (and potentially disaster, if the bowl comes loose).
Take care of your mixer, it’ll take care of you.
These machines last so long that we often get attached to them; and for many folks they become treasured family heirlooms. Regular care and maintenance is the key to a long and happy mixer life.
This is about Rosie. She’s a 4C, one of the final iterations of the design before Hobart went to the now-familiar K4 silhouette and internal architecture. We got this one cheap on eBay, and it came with the glass “beehive” bowl and combo beater/whisk. (The 4C did not support a flat beater or dough hook.) Just getting one with a glass bowl is quite a coup. She arrived in pretty sad shape; lots of ancient batter residue caked here and there, flour dust in the motor compartment, prehistoric grease, paint in rough condition.
Some “before” shots of the mechanicals.
I did a complete disassembly and cleaning, as well as replacing the power cord and plug. The estimable Kerri Hicks did the paint work and decoration.
The same parts, after many hours and lots of work with the ultrasonic cleaner.
It turned out great!
The dent on the motor cover occurred during transit (I have Many Thoughts about how to pack these things for shipping), and the 3D-printed unicorn horn is a perfect finishing touch.
I don’t remember exactly how old I was when it arrived; I was just a kid. (Maybe ten or so.) Avocado green, because that’s how it was done in the 1970s. Our old Sunbeam Mixmaster had gone to the great appliance farm in the sky. We had an Oster meat grinder which made the most unholy high-pitched scream when it ran.
Then, one day, there it was.
(Photo courtesy of Naomi W. Siegel)
This futuristic-looking machine did a superior job in both of the areas where it replaced the old mixers. And it had a “dough hook”, which as it turns out was really good for making bread.
I did a lot of baking with that mixer in the in-between years. Then came pursuits that took me out of the kitchen: cycling, college, all that stuff we get into once we hit our teenaged years and grow to adulthood.
This was my mom’s mixer. It’s still in the family. One of my older sisters has it now, and it’s in good hands.
One day last winter (I think it was), my sister mentioned that the mixer wasn’t running well. “I’ll be happy to take a look at it,” I said. She shipped it, it arrived, I replaced the motor brushes, much better now, enjoy. (It could have used a grease service too, and might need a new motor control plate; but I didn’t know that at the time and I didn’t feel competent to open it up. I’ve since put in a request to have it shipped in so that I can give it the spa treatment it deserves.)
So yeah. First KitchenAid mixer becomes first KitchenAid mixer repair job. It’s not “the avocado-green K45”, though. It’s still “mom’s mixer”.
(A note about the photo: the glass bowl is actually a “beehive bowl” from a 4C. It fits on the same bowl base, but isn’t the bowl the mixer came with. The original K45 bowl was stainless steel.)
Hello.
I’m a KitchenAid stand mixer repair enthusiast. That means that I think KitchenAid stand mixers are pretty awesome. I’ve been doing maintenance and repairs for friends and family for a while now, and I’ve bought a few mixers from Goodwill and eBay to help develop my skills and build a collection. (I might have a problem.)
Anything that goes wrong with a KitchenAid stand mixer, short of outright destruction, is fixable. Vintage KitchenAids (with some exceptions, there’s always an exception, don’t @ me) are built on the same architecture as modern ones — and in many cases you can use modern parts to return a failed vintage mixer to working order.
It adds up to a very satisfying hobby.
My goal with this here Internet web site is to show off some of the more interesting and/or satisfying work that I’ve done, and share some of the knowledge I’ve accumulated along the way.
This isn’t a business for me; I already have a day job. (And there are only so many hours in the day.) I’m going to keep doing routine maintenance and repair work for family and friends, but if you find a mixer on eBay, at a charity shop, yard sale, estate sale, or lying by the side of the road with a “Free” sign on it, hit me up and I’ll make it run like new.
If you want someone who will spend the time to do a thorough cleanup and tuneup of a treasured mixer, I’m game. Use the contact form to get in touch.
I’ll even clean and polish and try to make the repaired mixer look as close to new as I can. I don’t do painting or powder coating, but that’s OK — the scuffs and scratches tell a story of their own. (It’s part of the Kevinizing process that all objects go through as part of their natural lives.)
This site is a living organism, so keep an eye on it. I’ll be adding pictures and paragraphs. Enjoy!
(Photo: a cobalt-blue KSM90, the mixer I always wanted when I couldn’t afford one. I bought this one from the Goodwill auction web site, and was astonished when it came in at how little it needed — just a routine grease service, and a new rear cover to replace the one broken in transit.)
The subject of which grease to use when regreasing your mixer, and how much, can be confusing. There are a lot of arcane terms, and acronyms, and designations, and sometimes it gets to be a bit much. Hopefully the information in this post will help. Table of Contents Glossary of Terms The following technical terms… more →Regarding Grease
KitchenAid stand mixers are both heavy and fragile; this challenging combination of attributes makes it critically important that they be packed carefully for transit, whether in a moving truck or when being shipped. By far the best way to ship a mixer is in the original factory packaging. The packing was carefully designed and engineered… more →Have Box, Will Travel
Safety warning: Doing electrical work on countertop appliances can create the risk of an electric shock, which may be fatal. Always unplug the mixer before starting work on it, and if at all possible the work should be done by a qualified individual. The discussion here is intended to be educational, and not tutorial. Vintage… more →Regarding Power Cord Replacement on Vintage Models