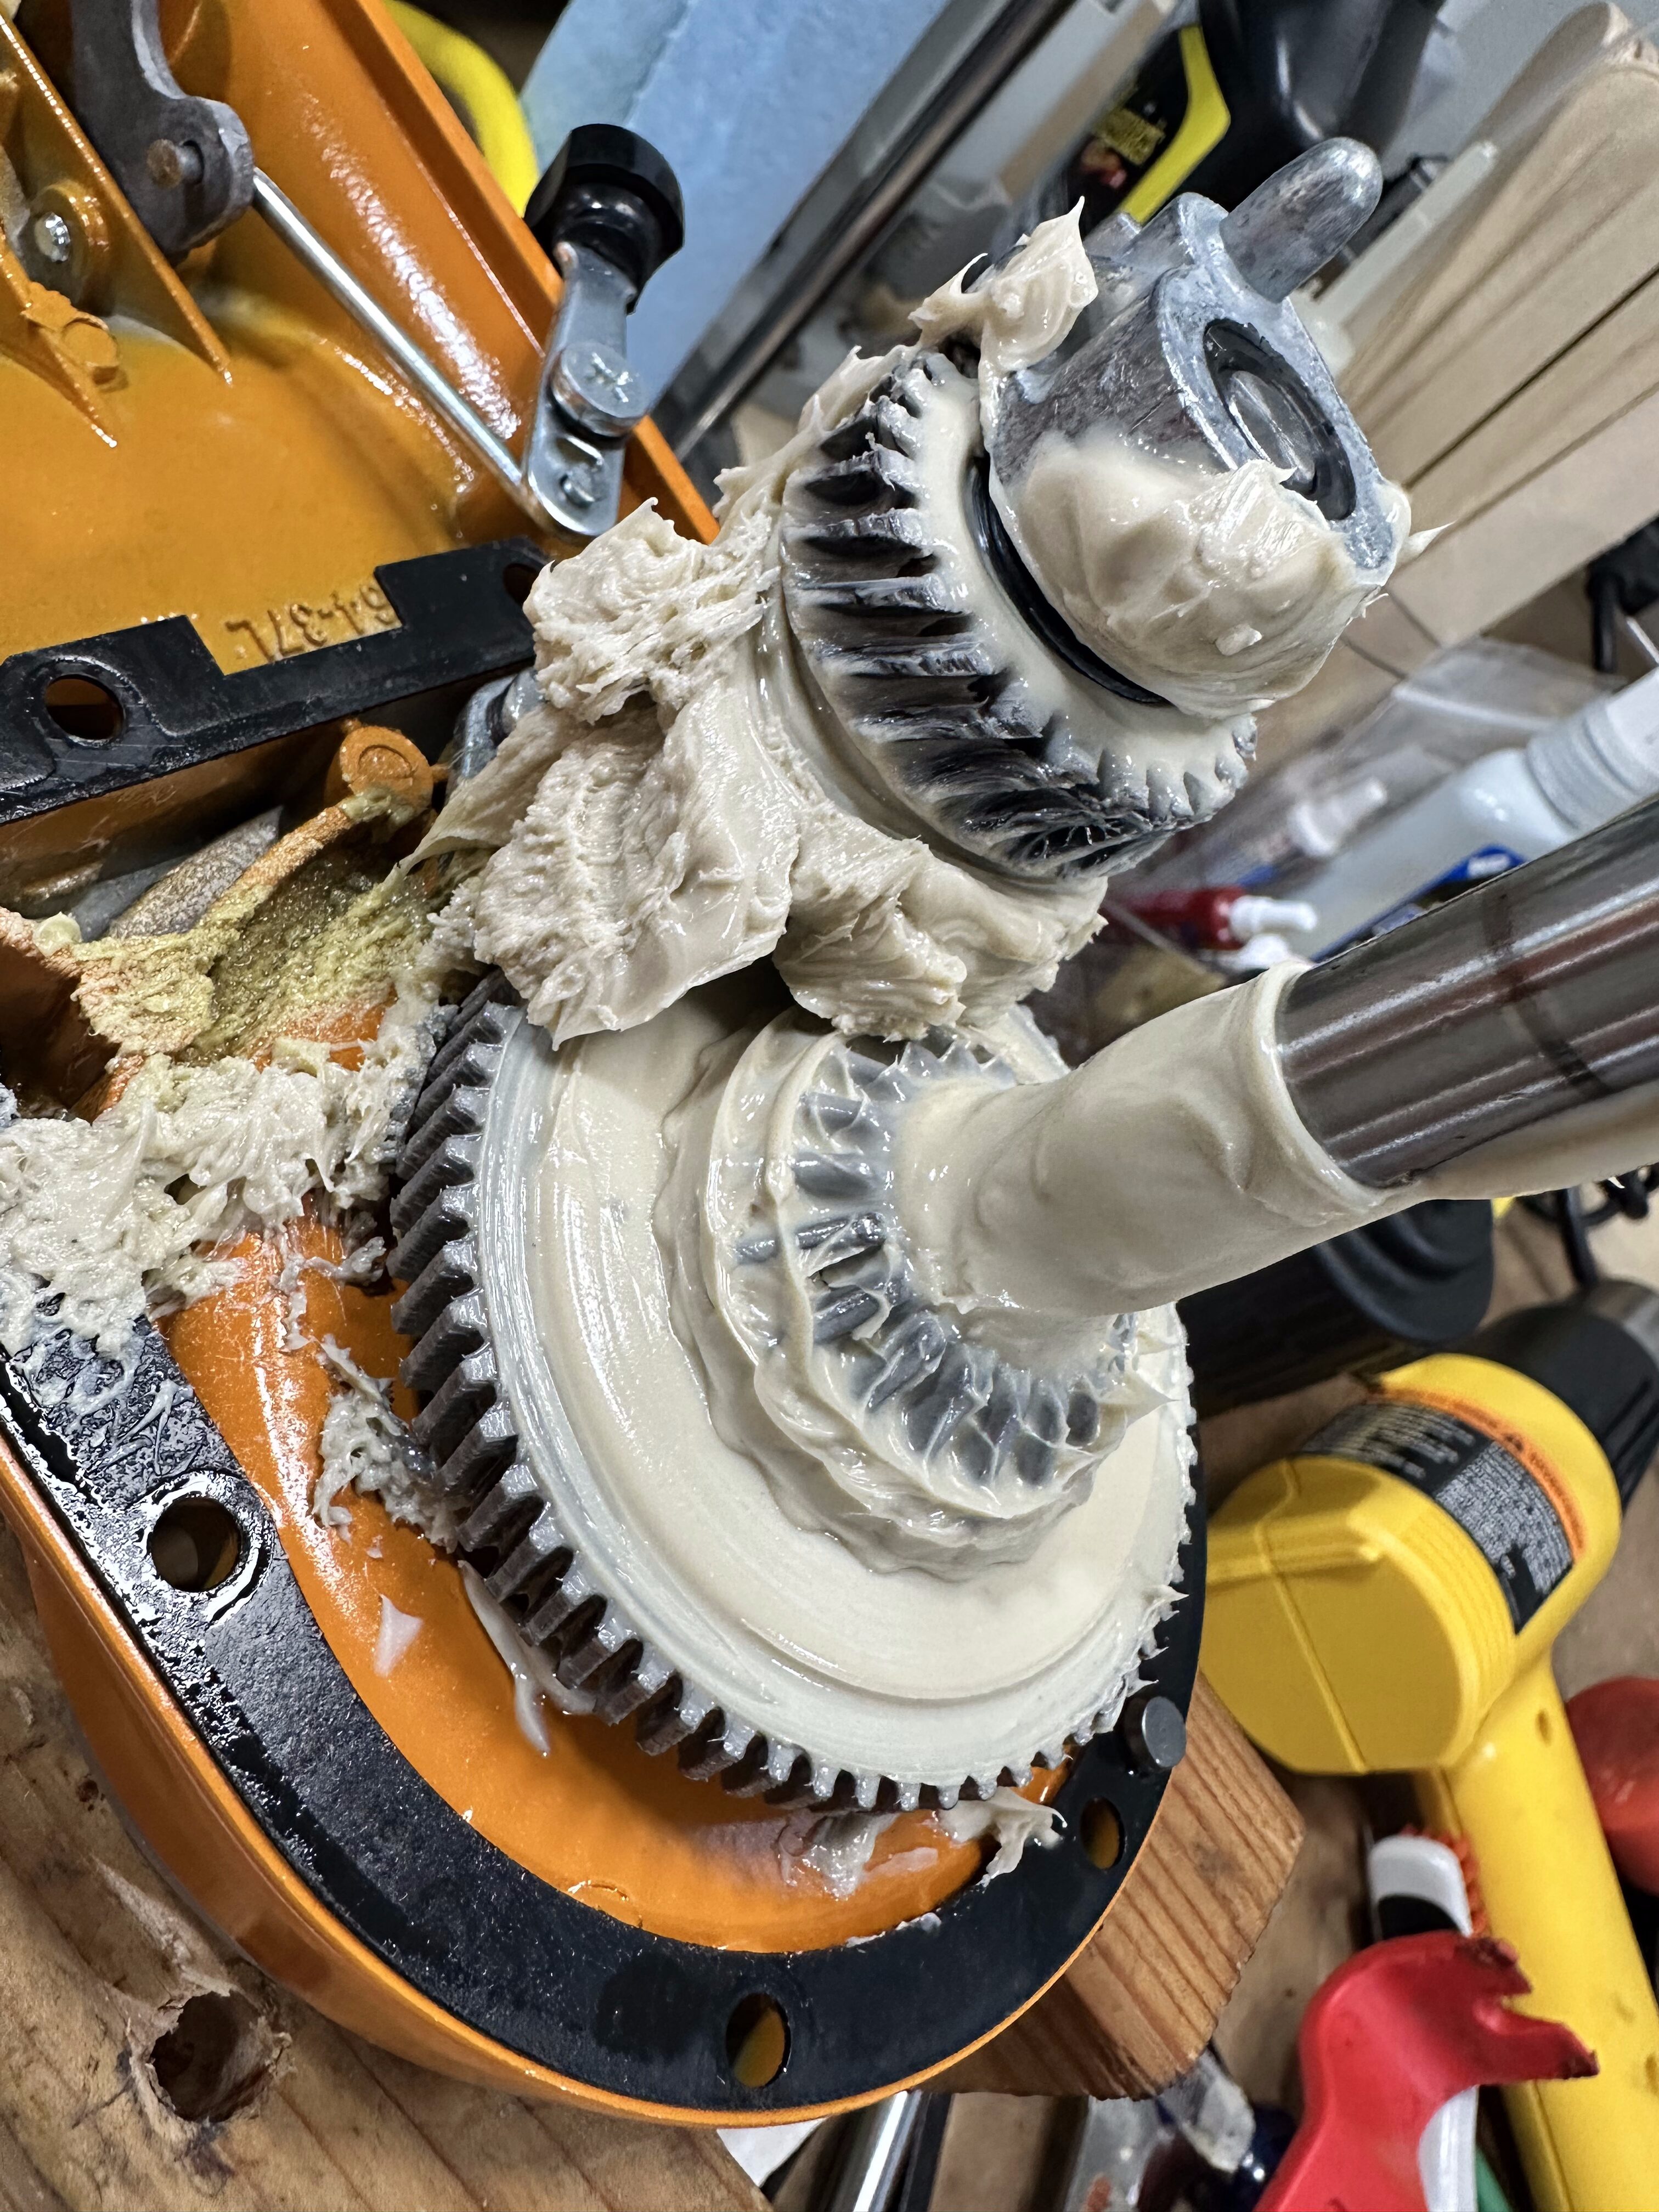
The subject of which grease to use when regreasing your mixer, and how much, can be confusing. There are a lot of arcane terms, and acronyms, and designations, and sometimes it gets to be a bit much. Hopefully the information in this post will help.
The following technical terms are used in discussing greases and related matters:
Consistency refers to how firm or soft the finished grease is. The National Lubricating Grease Institute (NLGI) has standardized grease consistency grades. The KitchenAid service literature reviewed for this post specifies an NLGI grade 2 grease, which is typically described as having the consistency of peanut butter. (Don’t spread it on toast, though.)
Base Oil is the lubricating oil held inside the grease. In broad terms, food-grade greases may use refined mineral oil, synthetic hydrocarbon oil such as polyalphaolefin (PAO), or blends. The base oil does much of the actual lubricating work; the thickener holds it in place and releases it under mechanical force. Typical grease formulas are mostly base oil, with a smaller amount of thickener and a still smaller amount of additives.
Thickener is the material that turns oil into grease. It acts somewhat like a sponge or scaffold: it keeps the oil from simply running out of the gearbox, while still allowing oil to reach the gear teeth when the grease is worked. Many thickeners are metallic soaps, but not all are; bentone clay and PTFE-thickened greases are non-soap systems.
Food-contact status—sometimes referred to as “food safety”—is a property of the finished lubricant, rather than something that can be inferred from one ingredient. In the United States, 21 CFR § 178.3570 sets the conditions under which lubricants may be used on machinery where incidental food contact may occur. Among other things, the lubricant must be formulated from permitted substances, must comply with any applicable limitations, and may be used only in the amount needed to accomplish its technical purpose.
KitchenAid states that the grease used in its stand mixers is food grade and approved for incidental contact with food. To preserve that characteristic when the mixer is serviced, in this post I recommend using a replacement grease that is currently registered NSF H1 or certified to ISO 21469. NSF H1 registration provides third-party review of the product’s formulation and labeling for incidental-food-contact use. ISO 21469 certification adds hygiene requirements governing the formulation, manufacture and use of the lubricant. Neither designation means that the grease is edible or intended for deliberate food contact.
Current H1 registrations and ISO 21469 certifications can be checked in the NSF White Book.
Bentone is a trade name commonly associated with organophilic clay thickeners, often made from treated bentonite or related smectite clays. The treatment allows the clay to disperse in oil and form a grease structure. (The original Shell Darina #2 used in old Hobart machines was bentone-thickened according to its data sheet, but is not rated for food safety.)
EP means “extreme pressure.” EP additives increase a lubricant’s load-carrying ability under conditions in which the oil film is too thin to keep the moving surfaces completely separated. They generally work by forming a protective film on the metal surfaces. Their effectiveness and material compatibility depend on the complete formulation, so an “EP” claim by itself does not establish that a grease is suitable for a mixer.
PTFE is an acronym for polytetrafluoroethylene, often referred to by the trade name “Teflon”. PTFE can function as a thickener in some specialty greases but is being discussed later primarily as a solid-lubricant additive.
More about Base Oil
Mineral oil and synthetic PAO base stocks can both be suitable for a stand mixer. Mineral-oil base stocks are widely used, generally cost less, and can provide entirely adequate service at the moderate temperatures encountered in household use. PAO synthetic base stocks generally flow better at low temperatures, evaporate less readily, and offer greater resistance to oxidation and viscosity change over a wide temperature range. Those advantages may provide additional operating margin or potentially longer service life, but they do not automatically make a finished PAO grease better for a mixer.
Base-oil viscosity is separate from NLGI consistency. Two greases can both be NLGI grade 2 and therefore feel equally firm, while containing oils of substantially different viscosity. The viscosity of the oil affects how readily it flows into loaded contacts, the thickness of the lubricating film, and the amount of drag or churning. Where a manufacturer publishes it, the base-oil viscosity at 40°C is therefore more informative than the word “synthetic” by itself.
The thickener does not just make grease “thick.” It also affects how the grease behaves under heat, water, shear, storage, and load. The same base oil can behave very differently depending on the thickener system. Here’s an overview and some detail:
Thickener System
Property It Creates
Potential Advantages
Caveats for Mixer Use
Bentone / organo-clay
A non-melting clay-gel structure
Very good high-temperature stability; no conventional dropping point; good water resistance
Can soften when subjected to prolonged mechanical working. The non-melting property is useful in very hot industrial applications, but is less important in a household stand mixer.
Aluminum complex
A balanced, soap-thickened grease structure
Good water resistance and mechanical stability. It also readily accepts extreme-pressure, antiwear, rust-inhibiting and antioxidant additives.
Its performance depends on the complete formulation and additive package. Aluminum complex alone does not guarantee the best load-carrying, wear-protection or corrosion performance.
Calcium sulfonate complex
A grease structure that can itself contribute corrosion protection and load-carrying performance
Excellent water resistance, corrosion protection, mechanical stability, extreme-pressure performance and antiwear performance; generally has a high dropping point
Food-grade products may be less commonly available in small packages and can be more expensive. Some of its performance advantages may exceed what a normally used household mixer requires.
Dropping point is the temperature at which a grease releases a drop of liquid under a standardized laboratory test. It is a comparative property, not the grease’s maximum safe operating temperature.
Bentone / organo-clay grease. Bentone is a treated clay, usually discussed under the broader category of organo-clay thickeners. Its main technical advantage is that the thickener does not melt the way many soap thickeners do, so these greases are often described as having no conventional dropping point. That makes organo-clay greases attractive where heat resistance matters. One technical overview describes organo-clay greases as having outstanding heat resistance, good oxidative stability, excellent water resistance, and fair shear stability, while noting that they tend to soften when worked.
A recent open-access paper on bentonite-based inorganic greases similarly describes bentonite clay systems as thermally stable and “no-dropping/no-melting,” while also noting that inorganic thickener systems can still face challenges such as mechanical stability and water/corrosion performance unless properly formulated. (Saying that an organo-clay thickener has no conventional dropping point means that the clay structure does not melt like a soap thickener. It does not mean that the grease can operate indefinitely at any temperature; the base oil can still oxidize, evaporate or otherwise deteriorate.)
For the end user, the takeaway is: bentone clay gives grease a high-temperature, non-melting structure. That can be an advantage if the grease is used in a hot environment. In a KitchenAid mixer, which should not be operating anywhere near industrial high-temperature conditions, bentone is not a magic upgrade; it is simply a different thickener system. A bentone grease can be suitable if the finished grease is food-grade, NLGI grade 2, compatible with the application, and from a documented manufacturer.
Aluminum complex grease. Aluminum complex is a very common food-machinery thickener. Manufacturer and industry technical literature (for example, this document from Lubrication Engineers) describes aluminum complex greases as offering good-to-excellent mechanical stability, high dropping point, excellent water resistance when well formulated, and good acceptance of EP, antiwear, rust-inhibiting, and oxidation-inhibiting additives. It also notes that aluminum complex greases are widely used as food-grade greases.
For the end user, the advantage of aluminum complex is balance. It is not necessarily the most exotic thickener, but it is a proven, practical choice. In a mixer, that may matter more than chasing the most impressive single property on a data sheet. A good aluminum-complex H1 grease can have the right consistency, stay in place, resist water reasonably well, and carry a suitable additive package.
Calcium sulfonate complex grease. Calcium sulfonate complex greases are often technically impressive because the thickener system itself contributes more than just structure. STLE describes calcium sulfonate complex greases as commonly having high dropping points, excellent water resistance and mechanical stability, excellent corrosion protection, low wear, and high EP properties.
A 2024 open-access study in RSC Advances examined the physicochemical, corrosion, rheological, friction and wear behavior of calcium sulfonate complex grease and found that performance varied with the particular overbased sulfonates used in the formulation.
For the end user, the principal advantage of calcium sulfonate complex is that the thickener contributes useful performance of its own, particularly water resistance, corrosion protection, and load-carrying ability. This can make it attractive where moisture, condensation or severe loading is expected. In a normally used household mixer, those properties provide additional margin rather than proving that calcium sulfonate is necessary or categorically better than a well-formulated aluminum-complex grease.
Greases Meeting the Stated Requirements
The following table lists documented candidate products that appear to meet the selection criteria discussed in this article: NLGI grade 2 consistency, current NSF H1 registration or ISO 21469 certification, and manufacturer documentation indicating suitability for machinery lubrication. The table is not exhaustive, does not constitute KitchenAid approval, and is not intended to imply that every listed product is identical to a factory-supplied grease.
Note: Composition is listed as disclosed in manufacturer literature. Grease formulas can change without notice, and public data sheets may not identify every nonhazardous additive. Treat “not stated” as unknown, not as proof of absence. For food-machinery use, verify the current NSF H1 or ISO 21469 status from the manufacturer or the NSF registry before buying.
CRC’s web site gives conflicting information about SL35600. In one location it’s listed as discontinued with limited remaining supply; but the package size SKUs are listed as “active”. So availability may vary.
Manufacturer specifications and registration status last checked June 2026.
What about PTFE?
PTFE, or polytetrafluoroethylene, is a fluoropolymer often referred to generically as Teflon, although Teflon is a trade name. Some grease manufacturers add very small PTFE particles as a solid lubricant. When the film of oil between moving parts becomes too thin to keep the surfaces completely separated, the particles may help form a low-friction layer between them, reducing friction and wear.
PTFE is one tool available to a grease formulator; it is not, by itself, a grade or guarantee of quality. Its effect depends on such factors as the amount used, particle size and shape, how evenly the particles are dispersed, the base oil and thickener, the other additives, and the materials, speeds and loads involved. In one peer-reviewed study of a particular titanium-complex grease, PTFE improved friction reduction and wear protection but did not improve the grease’s load-carrying capacity. A different formulation may produce different results. A grease containing PTFE is therefore not automatically better for a stand mixer than a well-formulated grease without it; the performance of the finished grease matters more than the presence of any one named ingredient.
For food safety, the relevant rating belongs to the finished grease, not to PTFE by itself. An NSF H1 registration means that the complete product is acceptable for machinery in which incidental food contact may occur. It does not mean that the grease is edible or intended for deliberate contact with food. A PTFE-containing grease should therefore be evaluated in the same way as any other mixer grease: verify its current NSF H1 registration or ISO 21469 certification, its NLGI consistency grade and its manufacturer’s application guidance.
The presence or absence of PTFE, by itself, is not enough to determine the suitability, performance or incidental-food-contact status of a finished grease.
PTFE is included within broad definitions of PFAS, but it is not the same substance as PFOA, PFOS or the other relatively small PFAS compounds that receive much of the attention in discussions of drinking-water contamination and human exposure. PTFE is a large, solid polymer and has different physical and biological behavior. A peer-reviewed review of fluoropolymers concluded that certain high-molecular-weight fluoropolymers, including PTFE, meet commonly used criteria for “polymers of low concern.” A separate peer-reviewed analysis argued that the available evidence is not sufficient to classify fluoropolymers as a group as being of low concern, particularly when manufacturing emissions, processing aids, impurities, particle releases and disposal are considered. It would therefore be misleading either to treat PTFE as identical to every other PFAS or to say that its production and disposal raise no environmental questions.
For a mixer owner, choosing a PTFE-free food-grade grease is a reasonable preference for avoiding a persistent fluoropolymer and its associated manufacturing and disposal concerns. A PTFE-containing H1 grease can also be a suitable choice when it otherwise meets the mixer’s requirements. Current evidence does not support treating the presence or absence of PTFE, by itself, as a simple test of either grease quality or safety.
In the table above, “yes” means that the manufacturer affirmatively identifies PTFE as a component. “Not stated” means only that PTFE was not identified in the public product literature reviewed; it does not prove that PTFE is absent. A safety data sheet is not necessarily a complete ingredient list, and manufacturers may change formulations, so current product documentation should be checked when this distinction matters.
A separate open-access study found a beneficial interaction between functionalized PTFE and another antiwear additive in the particular grease tested, further illustrating why PTFE cannot be evaluated independently of the rest of the formulation.
Which Grease Should You Use?
KitchenAid does not appear to publish a closed list of approved replacement greases. Its service literature has named particular products in different editions, but it has also used the wording “or equivalent,” and at least one KitchenAid service manual specifies only “a No. 2 grease”. This post therefore treats a product as a candidate replacement when it meets three conditions: it is NLGI grade 2; it is currently registered NSF H1 or certified to ISO 21469; and its manufacturer describes it as suitable for gears, loaded machinery, or comparable multipurpose industrial service. This is a conservative screening rule for identifying candidate replacements from publicly available information, not a finding that any listed product is fully equivalent to a factory-supplied grease or individually approved by KitchenAid.
Use a labeled, documented grease from a traceable manufacturer that is currently registered NSF H1 or certified to ISO 21469, is NLGI grade 2, and is described by its manufacturer as suitable for gears, bearings, loaded machinery or comparable multipurpose industrial service. H1 addresses incidental-food-contact acceptability, while NLGI grade 2 describes consistency. Neither designation, by itself, establishes suitable base-oil viscosity, antiwear or extreme-pressure performance, or compatibility with every gearbox.
The most common packaging is the 14oz grease-gun cartridge. This is somewhat inconvenient for DIY and large-volume work, since grease guns generally are not suited for delivering volume, and getting the grease out the cartridge can be a chore otherwise. Some folks will split cartridges open and scoop the grease out into another container. This is a valid course of action. If you work on a lot of mixers, a 35lb pail or even 120lb keg has a lower cost per ounce, but requires a larger up-front expense.
For DIY repairs, my personal recommendation is Super Lube 41160. I have found it to be a quality grease, and easy for me to work with. It’s available in a convenient 14oz tub size, and is widely available through many retail outlets at a reasonable price. It’s the grease I started with, and I still use it as an assembly lubricant in every job. If I were still doing one or two mixers a year, I would probably still be using Super Lube 41160 as my main grease.
My current gear case grease of choice is the Schaeffer 195 (SuperTac Food Grade Grease). I have found it to be very tacky on the gears, which I like. The downside is that online it is only available in cases of 14oz cartridges or in 35lb pails, so unless you are planning on using a lot of grease, you may have to look hard to find it locally in a manageable quantity.
I have also tried the Amsoil X-Treme Synthetic and like it (although it has not lured me away from the Schaeffer).
A couple of other repair folks whom I trust and respect have their own preferences: Clarion FMG 2 and Phillips 66 FMG are their go-tos and I find no fault with their choices. I have tried both greases and they seem to work as well as the Schaeffer.
Quantity Recommendations
K45/K5 models
For K45/K5-type machines (models with a round rear cover secured by a screw at the top), the factory service manual guidance is inconsistent. Some revisions of the manual say “6 fluid ounces”. Some revisions say “6 ounces, by weight”. The most recent revision (from 2022, at this writing) says “3-6 ounces (by weight)” in one part of the manual, and “3-4 ounces” (unqualified) in another.
From their data sheets, various of the appropriate greases have specific gravities of 0.88-0.95 (approximately). This translates to a weight of very close to six ounces for six fluid ounces (3/4 cup) of grease. (Concrete example; a measured 6 fluid ounces of Schaeffer 195 weighs 5.9 ounces.)
The difference in grease quantity when measured by weight vs. volume isn’t going to matter in any practical sense. I recommend no more than six fluid ounces, and no less than four fluid ounces.
KP26/KV25/KG25/KN15 models
For models with a large top cover secured on either side by two screws beneath the trim band and with a small transmission housing under the cover, the original factory service manual specified two ounces of grease, but did not specify whether by weight or by volume. (Per the above, it doesn’t really matter.)
Newer versions of the manual specify six ounces; I believe this is an error, because that much grease exceeds the volume capacity of the transmission cover by a significant margin. Field repair experience has shown that excess grease will also cause “gear knock”. Therefore I use and recommend the originally specified quantity of two ounces.
Dos and Don’ts
No matter which grease you choose, here is some prescriptive guidance:
Always clean out all of the old grease from the gear case and off the mechanical parts before regreasing the mixer. This ensures that wear products (ground up metal and plastic, mostly) don’t remain behind to compromise the new grease. It also avoids compatibility issues between old and new greases. (Incompatibility can cause a number of undesirable behaviors, including reduced lubrication, clumping and/or liquefaction, and accelerated wear.)
Always use a documented machinery grease that meets the selection criteria above. NLGI grade 2 specifies the intended consistency; it does not, by itself, establish suitable base-oil viscosity, wear protection, load-carrying performance or gearbox compatibility.
Always know what grease you’re buying. The table above is a good starting point for manufacturers and brands. If you find a name brand, check the data sheet to make sure that it is suitable. Avoid: unidentified or untraceable grease, including private-label products for which the seller declines to identify the manufacturer and exact product and/or refuses to provide current technical documentation and registration information. A reputable seller should be able to identify the exact product and provide, or link to, current manufacturer technical data and registration information. You can also use the NSF “White Book” for verification.
Never use animal or vegetable greases (beef tallow, bacon fat, vegetable shortening, etc), silicone grease, or industrial greases (lithium, automotive or heavy equipment grease) that are not H1 rated or documented for use in loaded-gear mechanical systems. Homemade animal/vegetable grease will go rancid and also does not provide adequate lubrication. Ordinary automotive or industrial grease has not necessarily been reviewed for incidental food contact. Do not use such a grease unless the exact product satisfies the selection criteria described above. Common silicone plumbing and dielectric greases are not documented for use in loaded-gear mechanical systems, and should not be used without manufacturer guidance.
Summary
Use a traceable, documented grease; this makes it possible to verify the product identity, technical data, current registration status, and fitness for purpose. Check each manufacturer for their food-safe offerings.
Choose a documented NLGI grade 2 grease that is currently registered NSF H1 or certified to ISO 21469 and that the manufacturer describes as suitable for gears, loaded machinery, or comparable multipurpose industrial service. NLGI grade 2 establishes the grease’s consistency, while H1 or ISO 21469 addresses incidental-food-contact suitability; neither designation by itself proves that a product is an appropriate gear lubricant.
KitchenAid has named different greases in different service publications and has also permitted “equivalents.” The products discussed here should therefore be understood as documented candidate replacements, not as products individually approved by KitchenAid. Within the selection criteria described above, several technically defensible choices remain; base stock, thickener system, PTFE preference, packaging, price and availability can be used to decide among them.
Avoid no-name “mixer grease”. If someone wants to sell you no-name grease but won’t tell you who manufactured it or provide you with the technical data or safety data sheets for it, buy somewhere else. A reputable seller should be able to identify the exact product and provide, or link to, current manufacturer technical data and registration information.
For K45/K5-type machines (tilt heads and bowl lifts which use a round rear cover secured by a screw at the top), use no more than six ounces (by weight or by volume), and no less than four ounces.
For KP26/KV25/KG25 and similar models (large top cover, small transmission housing inside toward the front of the machine), use two ounces (by weight or by volume).
Do not substitute culinary fats, ordinary axle or chassis grease, or common silicone plumbing or dielectric grease. Use only a product that meets the selection criteria described above.
KitchenAid stand mixers are both heavy and fragile; this challenging combination of attributes makes it critically important that they be packed carefully for transit, whether in a moving truck or when being shipped.
By far the best way to ship a mixer is in the original factory packaging. The packing was carefully designed and engineered to protect the mixer and associated items (bowl, accessories, etc) from damage resulting from ordinary handling during common-carrier transit. (Pro tip: it doesn’t matter how many “Fragile” labels you slap on the box. I’ve spoken to UPS and FedEx drivers, and to a one — and independently — they say that such labeling doesn’t affect how the box is handled by the carrier.)
For this reason, I always recommend that you keep the box that the mixer came in, if space permits. Put it in a large heavy duty poly bag (I like Warp’s “Banana Bags” for this), twist the top shut, and tie a knot in it.
How to Get A New Factory Box
If you have discarded the original box, you can obtain a replacement for most models by calling KitchenAid’s “Repair and Return” line at (855) 845-9684 in the US. Explain to them that you need a box so that you can ship your mixer. Be very clear that you only want the box — you’re not sending it in to KitchenAid for repair. Otherwise they will charge you a diagnostic fee.
They may take your order over the phone, or ask for your email address and will email you a link to a form that you can fill out to order the box. If they do the latter, make sure to check the “BOX ONLY” box on the form.
Either way, have your mixer’s model number and serial number handy, from the label under the base. This will ensure that you get the correct box for your mixer.
Note: As of this writing, KitchenAid no longer has boxes available for the K5-type machines. This includes the K5-A, K5SS, KSM5, and other 5-quart bowl-lift models which have a round rear cover secured by a screw at the top.
In addition, KitchenAid will not supply a box for the Accolade 400 or for any of the vintage machines (3B, 3C, 4C, etc). For those you are on your own.
How To Pack A Mixer
These are the instructions that I provide to customers who are shipping K5-type mixers to me for repair, and which I follow when packing a mixer for return to the customer after the job is done.
Note: These instructions apply only to models for which the factory box is no longer available. Whenever possible, get the factory box from KitchenAid or use the one you have.
I have written these instructions for K5 machines, because that is the most common situation which requires packing it yourself. These may be adapted for the Accolade 400 or smaller vintage machines.
Things you’ll need:
A shipping box, heavy duty, no larger than 20 x 20 x 20 inches.
Foam insulating board or “plank foam”.
Bubble wrap (with large bubbles). Do not use Amazon air pillows or anything similar; they will pop and leave the mixer unprotected.
A pool noodle. A length of water pipe insulation (3/4″ ID) is acceptable.
The factory shipping box for K5 machines is 13w x 15d x 20h, so you will need a heavy-duty shipping box that is at least that big in each dimension. 18x18x18 is too small, 20x20x20 is ideal. 24x24x24 is too large and will incur significant additional cost. You can improvise with an existing box if necessary, as long as it is heavy duty and of the proper dimensions. Don’t use a repurposed Amazon shipping box; they are too flimsy to provide proper protection.
If you are shipping a smaller machine such as an Accolade or 4C, you can reduce the size of the box correspondingly. Just make sure that there is at least two inches of clear space around the mixer on all six sides, in order to make room for the foam walls.
Whatever you do, DO NOT USE PACKING PEANUTS. I cannot emphasize this enough. They will shift and leave the mixer unprotected in the box. This will result in irreparable damage to irreplaceable parts. (I am aware that many packing experts use packing peanuts. They can do so because they know how to settle them properly so that they don’t shift.)
It should be possible to buy a shipping box at Staples, Home Depot or Lowe’s. Make sure you look for a shipping box, not a moving box. Moving boxes are not as strong as shipping boxes and generally get destroyed by most package handlers.
At Home Depot, Lowe’s, or a similar store, buy sheets of 1-inch insulating foam (it resembles Styrofoam and in fact usually is). You’ll need to use a razor knife or a fine saw to cut pieces to fit into the box. Make sure that there are at least two full layers of foam on each face of the box (top, bottom, and four sides) for a minimum foam thickness of two inches on each side. If you have a bigger box, use more foam layers. “Plank Foam” is ideal for this, but is harder to find.
Once you’ve lined the box with foam:
Cut two pieces of pool noodle, each long enough to cover one arm of the bowl cradle. Then push a piece of pool noodle on to each arm of the cradle.
Put the mixer in a plastic bag (a garbage bag is fine; anything that completely encloses the mixer to keep leaked oil from getting on the packing fill).
Set the mixer in the box, placed in the center so that there is equal space all around.
Fill ALL of the space around and above the mixer with bubble wrap. Pack in enough material so that the mixer can’t move around in the box, at all. DO NOT USE PACKING PEANUTS AS SPACE FILLER. You can also use brown packing paper (the same stuff that Amazon uses). Really stuff it in there – it will take more than you think.
When you’re finished, make sure that the mixer doesn’t move around inside the box at all. It’s crucial that the mixer not shake, wiggle, wobble, shimmy, slide, or glide inside the box, since collisions with the side of the box are what cause the most damage.
Put the top layers of foam on top of the mixer, and seal up the box. (You may have enough fill that you need to press down slightly to close the top, but not so much that it bulges.)
If you use a pack-and-ship place for this, make sure they follow the above guidelines: heavy duty shipping box; at least two inches of hard foam on all sides; pack the mixer in so that it can’t move, and NO PACKING PEANUTS. If they have a foam-in-place machine that is ideal, but not many places do. Either way they will charge you for the time and materials required to pack it.
Seal the box with a high-quality packing tape intended for shipping. (Some tape is labeled for moving and storage; don’t use this. Also don’t use duct tape.)
When this is done, the mixer is ready to ship. The bowl and accessories (beater, dough hook, wire whisk) can be shipped separately, if needed.
When packed this way, your mixer has the best chance of making the trip safely, without costly damage to irreplaceable parts.
My repair rates include UPS Ground shipping, so if you are shipping a machine to me, I will provide a prepaid UPS Ground shipping label for you to use.
If you are shipping your machine somewhere else. I recommend using PirateShip to compare rates and see which service has the best rate for you. (You can also create an account and generate shipping labels. You’ll need the weight and dimensions of the box.) UPS and FedEx ground service are both good; USPS may be the only alternative in some locales, but their rates are often remarkably high in comparison to the others.
Safety warning: Doing electrical work on countertop appliances can create the risk of an electric shock, which may be fatal. Always unplug the mixer before starting work on it, and if at all possible the work should be done by a qualified individual. The discussion here is intended to be educational, and not tutorial.
Vintage mixers (in general, anything produced before the “solid state” K45SS was introduced in 1980) are equipped with two-wire power cords. In general, this is safe and the mixer can be used, provided that the power cord itself shows no signs of damage such as cracking or splitting of the sheath.
One thing to keep in mind is that if you present a ground path while using the mixer, you may get a shock. Generally this occurs if you are touching the mixer, and then come into contact with a grounded appliance (with a three-wire cord plugged in) or a water pipe, sink, or faucet.
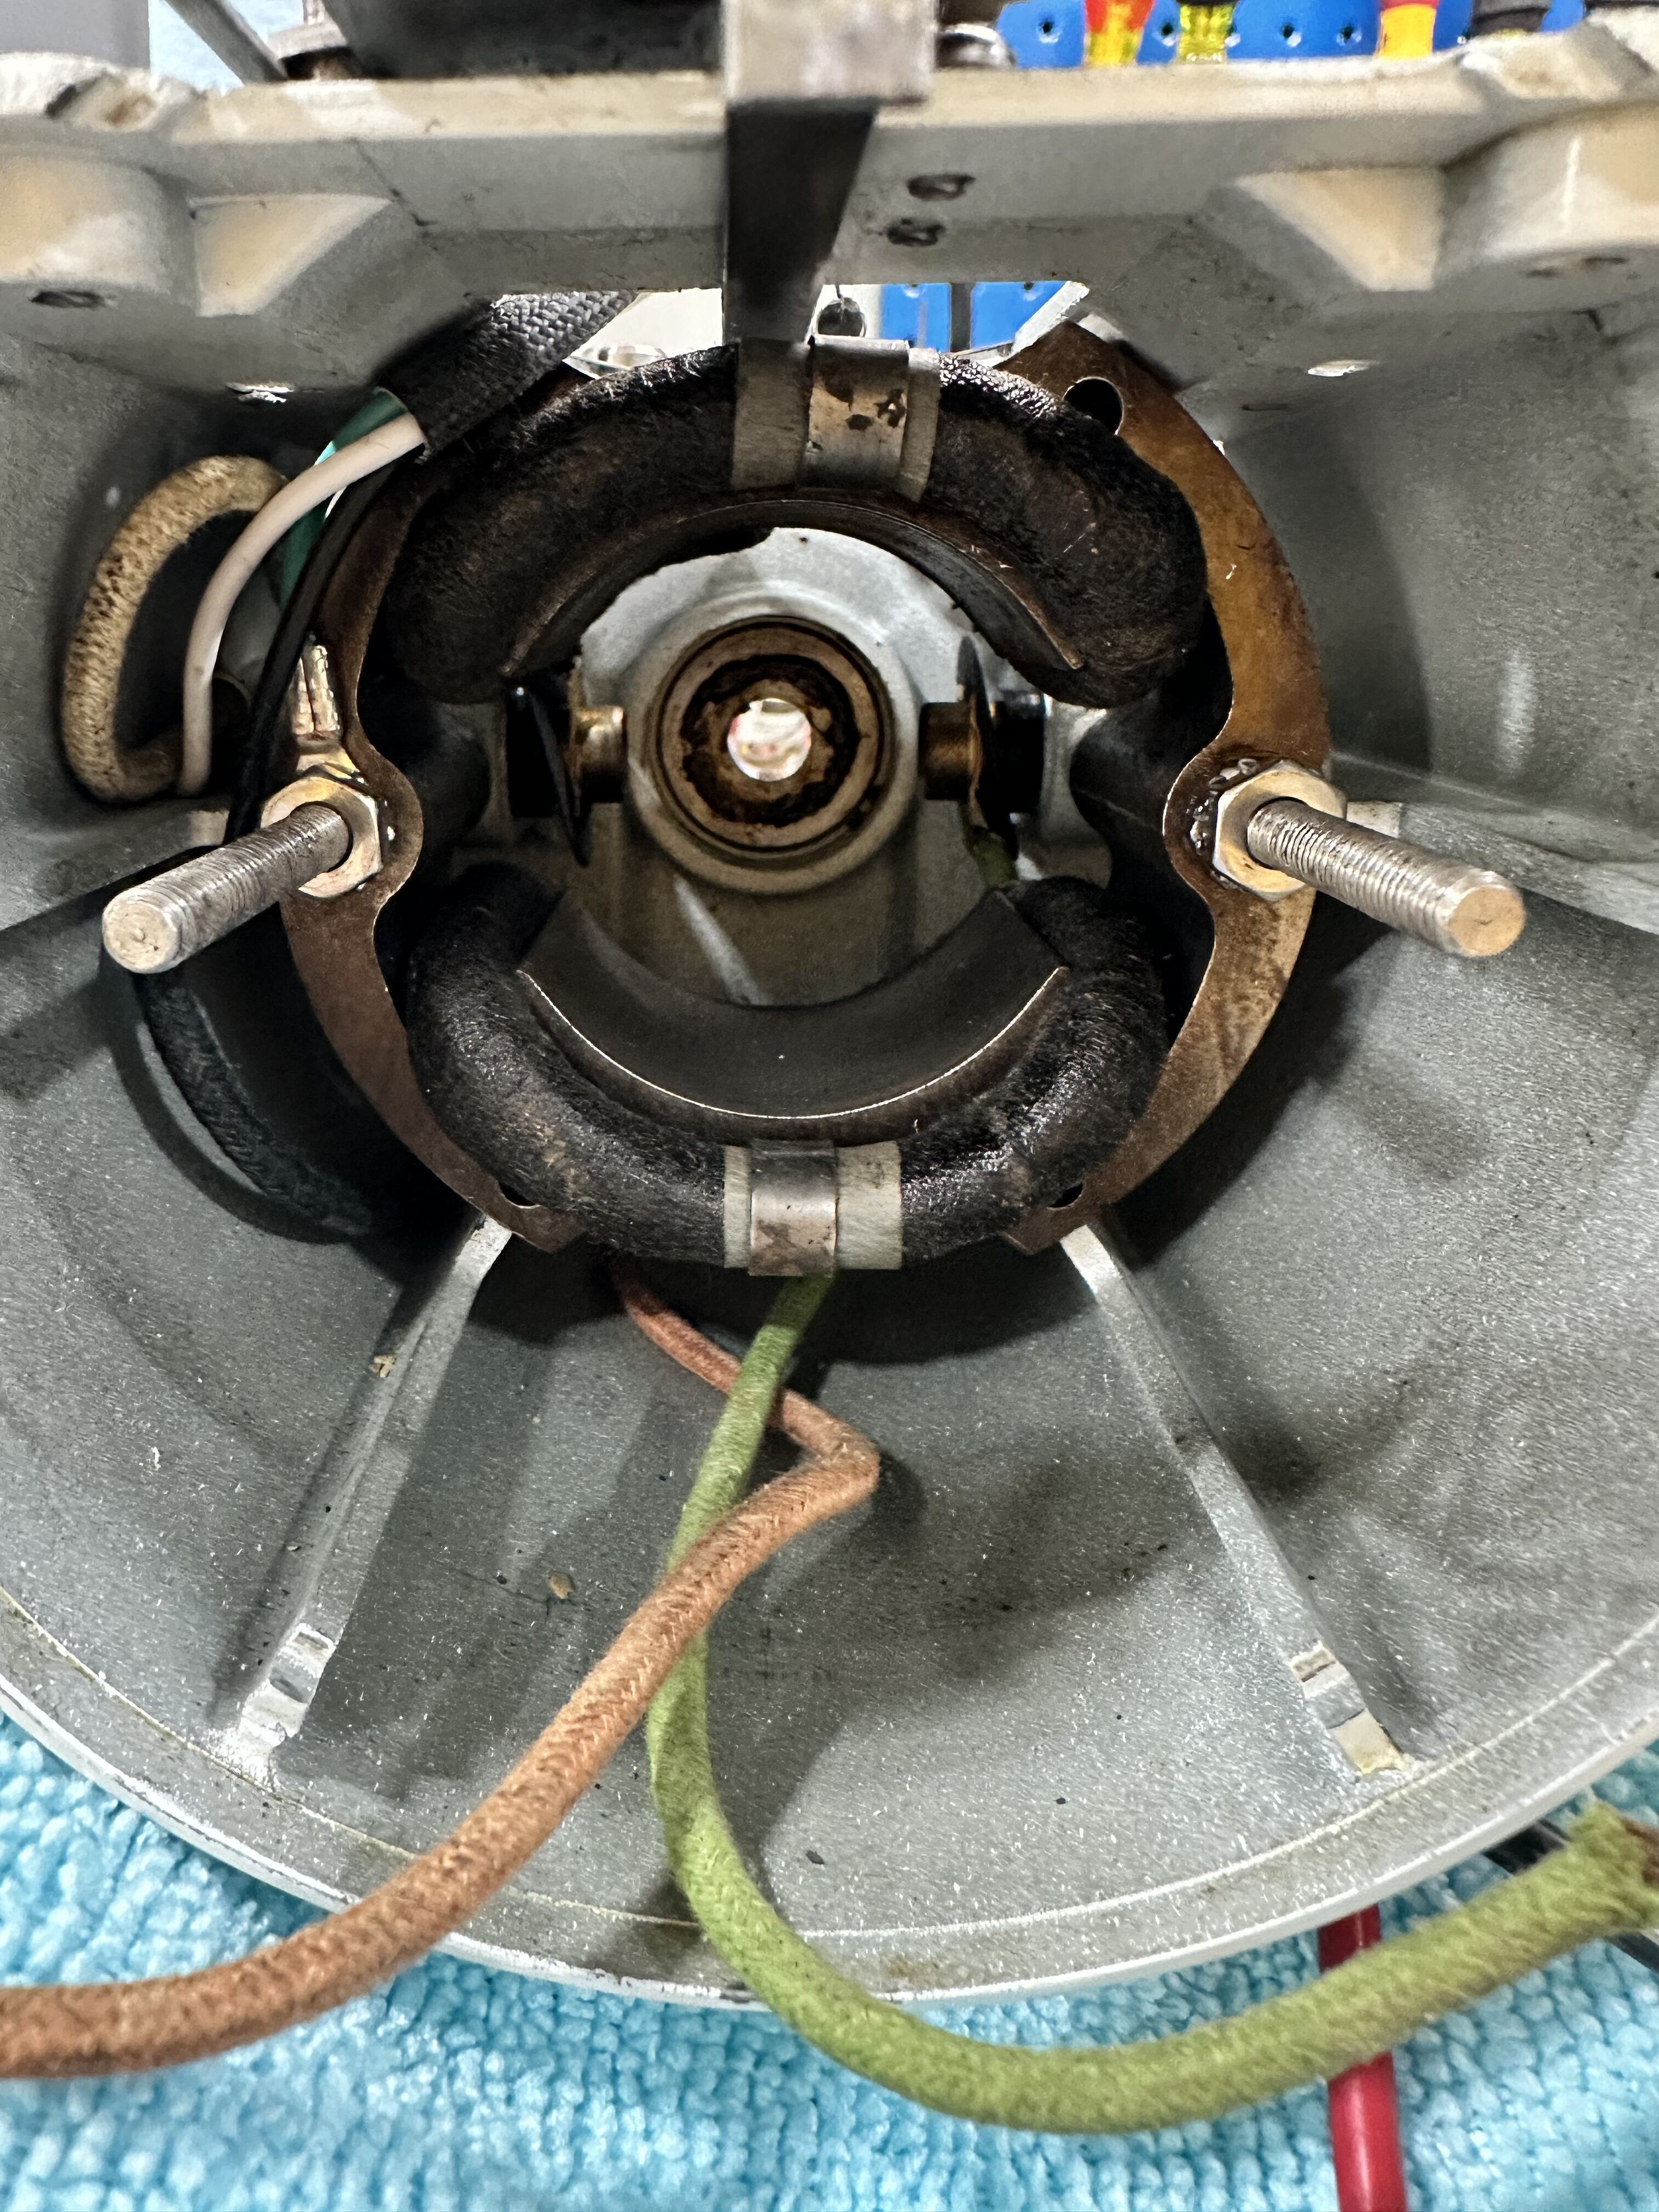
When I overhaul vintage machines, I will always install a three-wire grounded cord, with the ground lead connected to one of the stator screws (adjacent to where the power connections are made).
One popular video for installing a grounded cord on vintage machines tells the viewer to cut the factory cord off outside the motor housing, modify a factory cord, and splice it on to the stub of the original power cord. I strongly recommend against doing this, for various reasons:
Cutting the factory cord leaves the remains of the original wiring in place. In cases where the mixer is very old, the insulation on the factory wiring can be degraded, leaving unsafe wiring in place.
On older mixers, there is an RF drain capacitor tied to the housing across the neutral power connection. The function of this was to prevent electrical noise from the motor from interfering with AM radio reception, but here in the 21st century that is no longer an issue. However, the RF drain capacitor can often fail, and when it does it usually shorts and ends up putting mains voltage on the outside of the housing. Therefore, it needs to be removed during overhaul. The work to remove the RF drain requires the same disassembly that is required in order to correctly install a replacement power cord, so there’s no reason not to do both.
The technique shown in the video shows connection of the power cord ground lug to one of the switch bracket screws. This is a bad idea, because those screws are very short, partially threaded, and do not have much thread to spare. Thus, clamping a ground lug (or wire) under one of these screws can compromise its engagement, allowing it to vibrate loose over time.
Butt splices introduce a rigid section into the wire, which makes it more difficult to route the power cable during installation and assembly. Additionally, getting a proper mechanical and electrical connection depends heavily on getting a good crimp. It’s not something that should be left to chance.
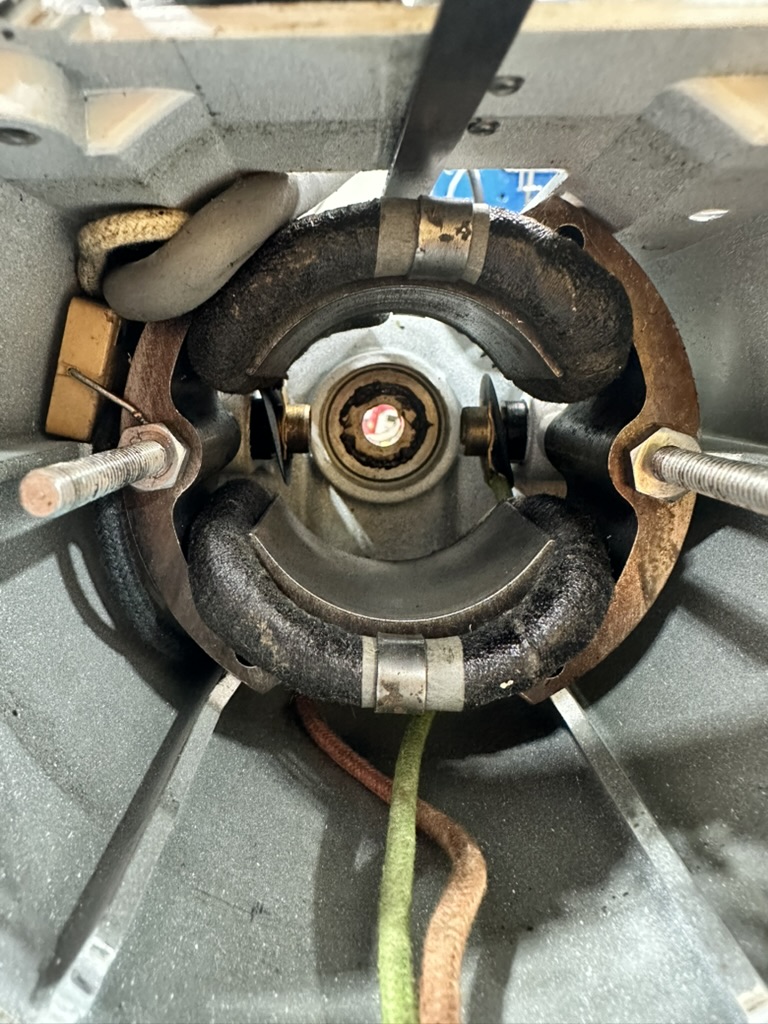
Here is an object example of unsafe wiring in a vintage K4-B. From outward appearances, the original cord “looked fine”: the sheath was in good condition with no splitting or cracking or other damage, all the way up to where the cord entered the motor compartment.
Original wiring in a 1950s-vintage K4-B. The power cord (thick gray) enters at the top left and tucks behind the stator. The tan box at left center is the RF drain capacitor.
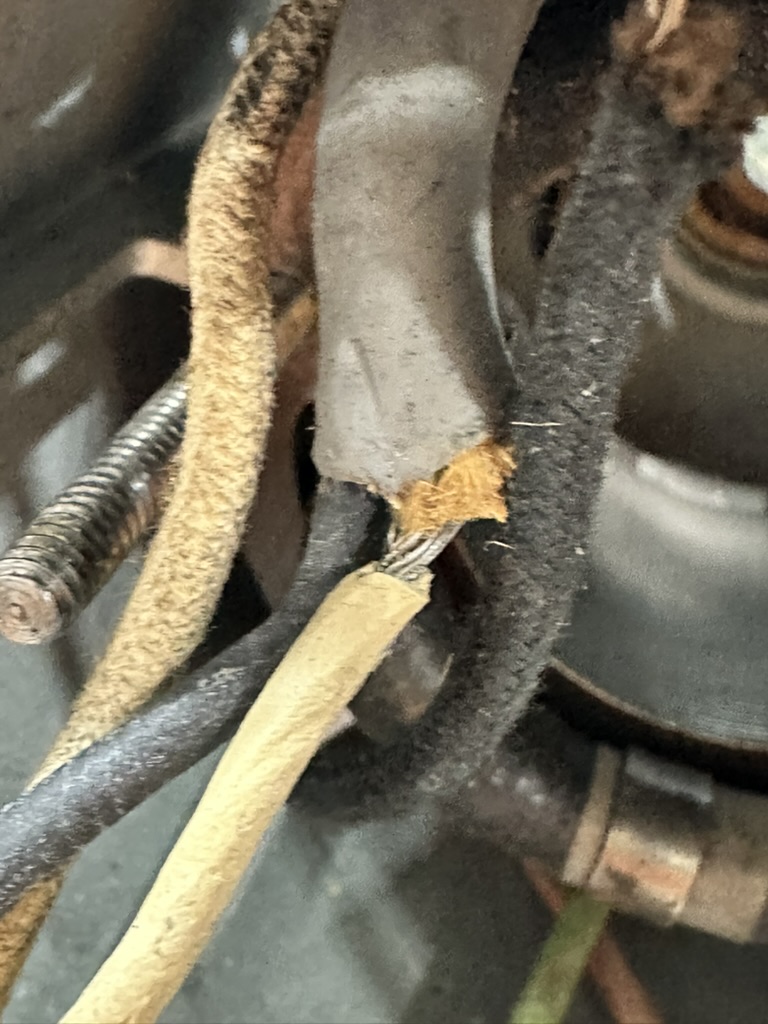
After disassembly, though, a different story. The insulation on the neutral (white) power lead had been degraded by proximity to the heat of the motor over the fifty years the mixer had been in service, and had cracked away, exposing the wire.
After extracting the power cord leads, the failed insulation and exposed conductors on the neutral (white) lead are visible.
Chopping the old cord outside the housing and butt-splicing in a replacement would have left this damaged wiring in place, potentially creating a shock hazard.
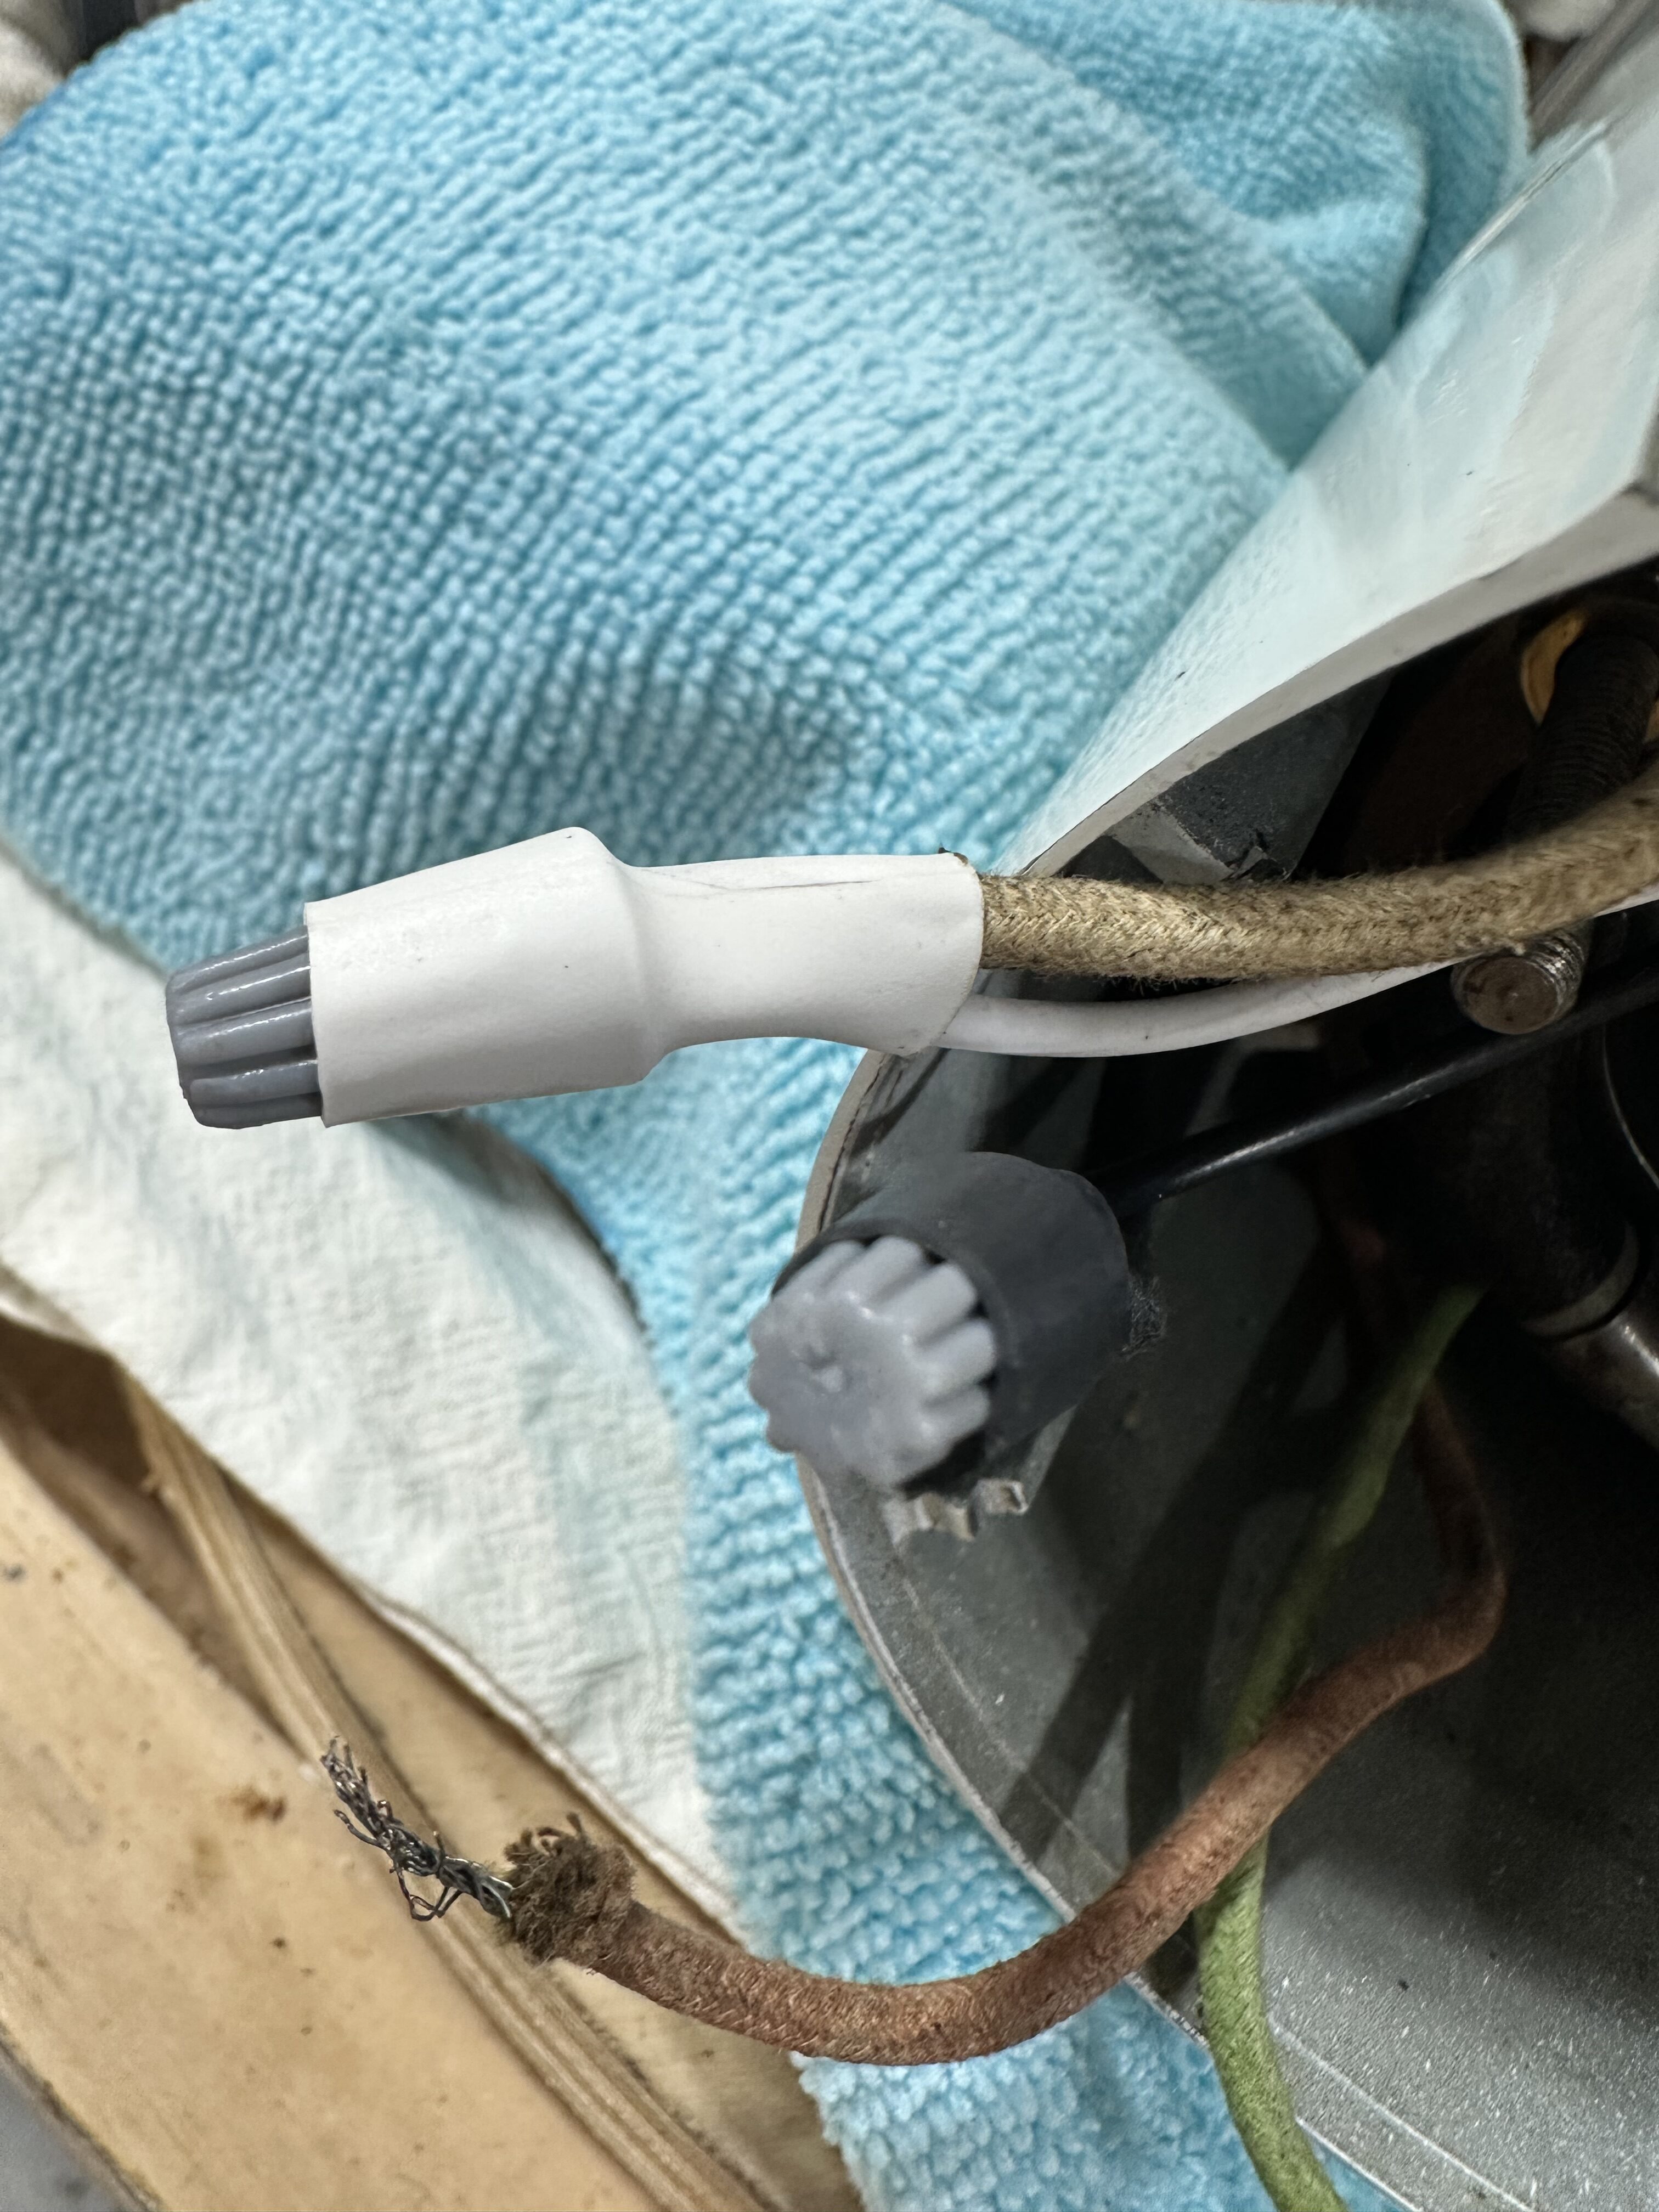
When installing a replacement cord, I start with an 18/3 SVT power cord with a molded plug. (I buy mine from Antique Lamp Supply.) This is cut to length to match the original cord, the sheath stripped to match the original cord, a protective heat sleeve is added to guard the leads close to the motor, and the power leads tied to the original using new wire nuts. Use an appropriate ring lug (#10 screw size) for the ground lead, and clamp it under one of the stator nuts.
(Side note: 18-gauge wire matches the original. There is no reason to use a heavier gauge wire, and in fact doing so complicates the job because the thicker wire is harder to work with and won’t route the same way as the original.)
Here’s what that looks like in progress and when it’s finished:
Detail of replacement power cord connections.Completed installation of replacement power cord. The black sheath is slid into place once the power cord is routed, to guard the leads from heat from the motor. The ground lug is visible on the left stator stud.
Replacing the power cord this way ensures safety (when done correctly) and leaves a nice, cleanly finished job.
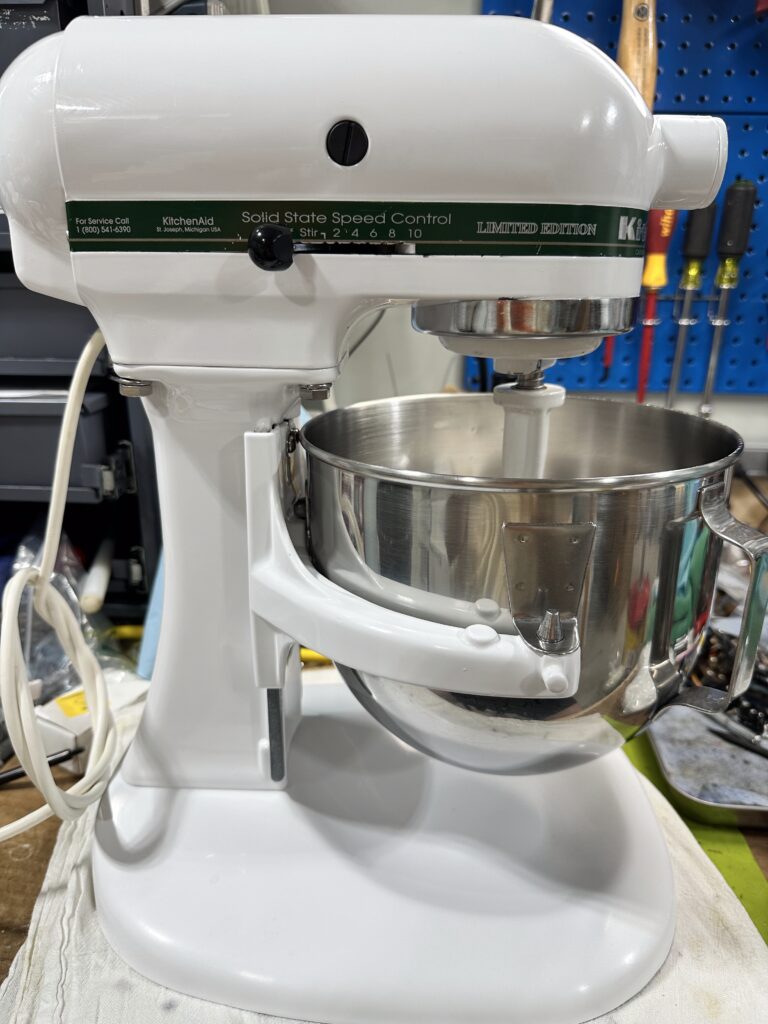
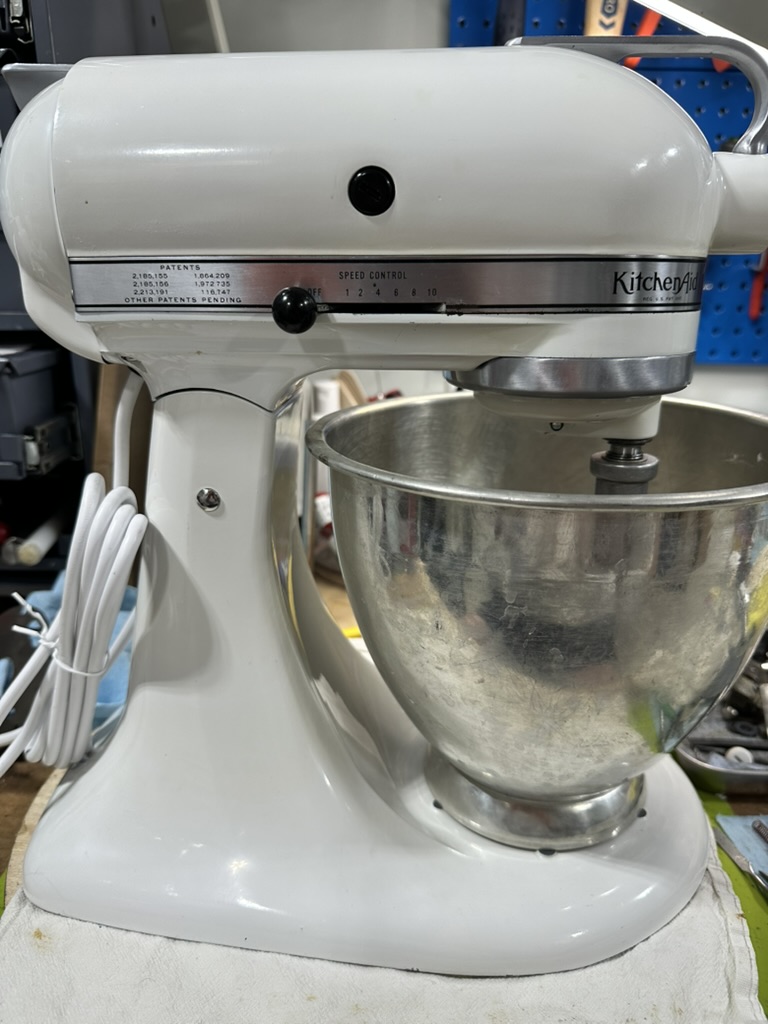
Since you read this far, here’s the prize: a photo of the mixer after completion of the overhaul.
The KitchenAid mixer parts market is chock full of imitations, knockoffs, and replicas; and sometimes it’s hard to know which ones are OK and which ones are not.
The safest course of action is always to get the genuine factory part from a trusted supplier. Sometimes this may cost a little more, but it works out in the end because the part will last longer and quite often work better.
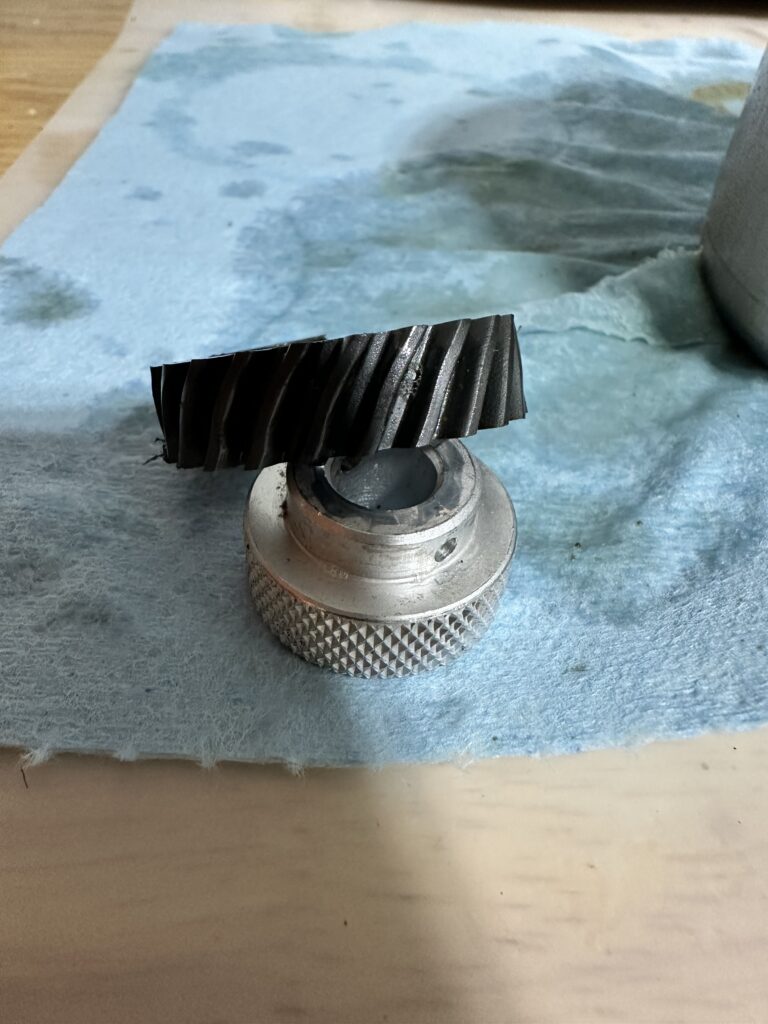
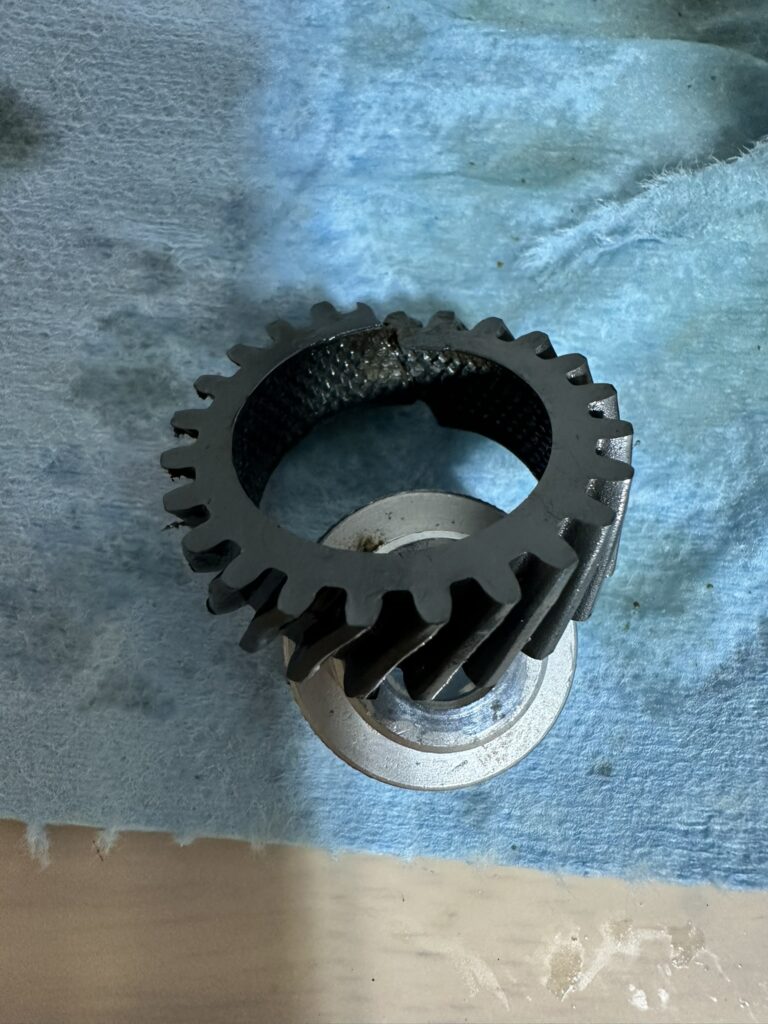
Here’s an example: the “sacrificial” worm follower gear used in K45/K5-type machines. This gear has a nonmetallic helical tooth ring molded on to an aluminum hub.
On the genuine factory part, the hub is knurled so that the molded ring grips it very tightly, and resists slipping. These photos show an old gear (1990s vintage) that failed; it was worn and under excess load the plastic actually cracked and came off the hub.
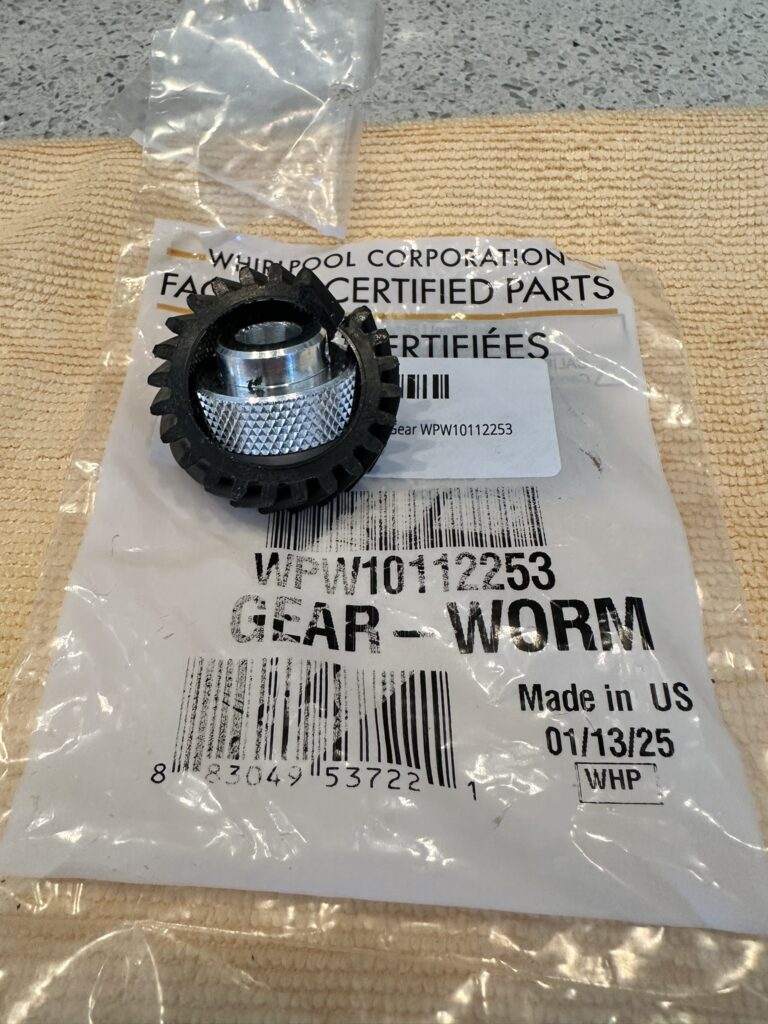
Here’s a brand new factory part (manufactured in 2025), showing the same structure.
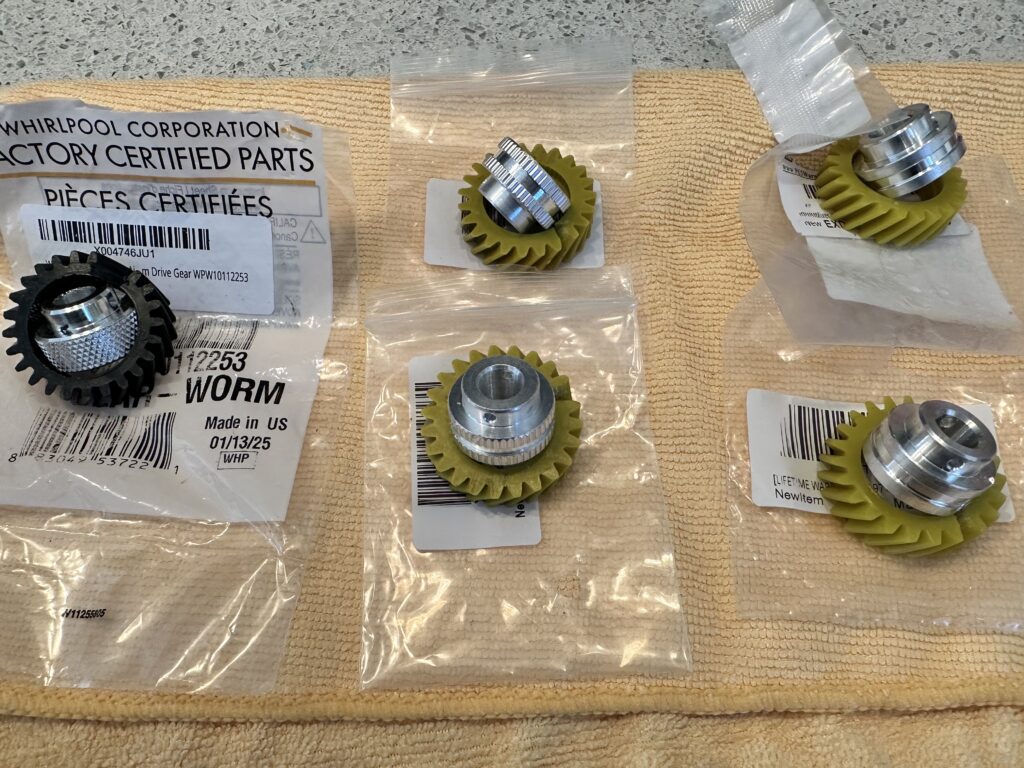
Now, here’s a rogues’ gallery showing the factory part and various cheap aftermarket gears which I bought on Amazon and cut apart to show their internal structure. (Note: I made an effort to obscure or blur out any identifying details in the aftermarket parts, because the goal is not to shame individual sellers or suppliers.)
All of these gears attempt to replicate the yellow material that Whirlpool used on these gears for a time. This gives them an appearance of credibility, but as can be seen by their hub design, none of them are made to the factory standard.
The gears on the right have smooth hubs, and under any nontrivial load, the tooth ring just slips and spins around the hub. When you take the mixer apart to figure out why the beater isn’t moving under load, you’ll think the gear is OK because there isn’t any obvious damage; but it’s not fit for service (and wasn’t in the first place).
The gears in the middle have ridges on on the hub, which is a low-budget attempt to replicate the factory knurling. However, there’s not as much surface area exposed to grip the tooth ring, so while these gears might hold up longer, there’s no way to know.
(And, to the point, when you buy something other than the genuine factory part, you have absolutely no way to know whether it was manufactured to the OEM standard.)
What About Those Metal Gears?
Some sellers are pushing a metal gear to replace this particular part. This should be avoided at all costs.
Part of the function of the nonmetallic gear is to function as a “mechanical fuse”; using the metal gear in this location would be like putting a penny in your fuse box instead of an actual fuse. If something jammed the beater or a hub attachment, you’d end up actually burning out the motor or severely damaging the gears.
Also, the metal ones grind themselves up and fill the grease with metal particles. This accelerates wear on the other drivetrain components.
Finally, the metal gear will wear out the “worm” on the motor shaft, requiring replacement of the armature which would otherwise be unnecessary.
Model types which use a metal “sacrificial” gear (or no sacrificial gear at all) are designed for it; they have electronic speed controls which can detect motor stalls and stop the machine before damage occurs.
Here’s a list of recommended suppliers. These are all established businesses which sell genuine parts at competitive prices, without excessive markup or cheap knockoffs.
Beginning in roughly 2019, Whirlpool (operating as KitchenAid) has significantly reduced the amount of grease put in to the mixer’s gear train when assembling K45-type models (the “Classic”, “Artisan”, and other models similarly constructed).
The factory service manual specifies six fluid ounces (a nominal 3/4 cup) of grease of an appropriate type, and has done so since this model type was introduced decades ago. The quantity of grease serves several purposes: in addition to creating a lubricating film on the gears and other moving parts, the additional grease serves as a reserve to help in the uptake of wear products, and helps the gears run nominally cooler. And finally (but notably), the grease also changes the acoustic signature of the mixer, causing mixers with the appropriate grease load to sound little bit quieter.
Here are a couple of photos from a 1970s-era Hobart K45. In this instance, the grease has significantly thickened and hardened with age, but it’s clear that the gear case was significantly filled up.
This grease load is typical of mixers manufactured up to the late 2010s. (In fact, there was more grease in the gear case than is shown here; some of it came out in chunks when the case halves were separated.)
In contrast, here’s a mixer of the same type, manufactured in 2023.
The absence of grease left in the upper housing is clear, as is the significantly smaller quantity of grease on the gears.
While there’s no specification or measurement for the amount of grease that KitchenAid is currently using in new or refurbished mixers, it is clearly a great deal less than in years past.
This shortage of grease is relevant, because the reduced lubrication accelerates wear on the “sacrificial” worm follower gear, and hastens its early failure. This has resulted in mixers coming in for repair prematurely, often within the first two or three years of ownership.
My recommendation is that if you have a mixer of this type, and it was manufactured (or purchased refurbuished) starting in 2019 or later, consider cleaning and regreasing the gears. This will improve the longevity of the internal parts in the gear case, and give you a chance to inspect the mechanical parts for premature wear or signs of failure. During reassembly, refill the gear case with the proper quantity of appropriate grease (6 fl-oz, NLGI #2, NSF H1/ISO 21469 rated). Here is more about grease types and compositions.
Appliance Parts Pros: Speed Control Plate Replacement (an older video, but helpful. Ignore the bit about transferring the spring over from the old plate.)
Sometimes a question comes up, of the form “Should I buy the Classic model, or the Artisan? The Artisan has more power, do I need that?” And occasionally, “I’m looking at a 575W model and a 500W model? Which one should I get?”
The “wattage” ratings that KitchenAid uses aren’t relevant to the mixer’s performance or fitness for a particular purpose; this post explains why.
The Artisan® and Classic™ Series mixers both feature alternating current motors. The Artisan®motor is 325 watts, while the Classic™ motor is 275 watts. The additional power on the Artisan®mixers can help when mixing thick, heavy doughs.
The power rating (authoritatively, on the label under the base) is derived by measuring the power consumption of the mixer with a maximum (simulated) load while running at the maximum speed setting. As equipped from the factory, the only substantive difference between the Classic and the Artisan is that the Classic comes with a 4.5 quart bowl, and the Artisan comes with a 5 quart bowl. A fully loaded 5 quart bowl requires the mixer to consume more power to run at maximum speed than the 4.5 quart bowl.
Thus, the maximum power consumption relates to the load on the motor, which relates directly to the size of the batch in the mixer bowl. A larger bowl can hold more, and thus the mixer will consume more power for a given speed with a full 5 quart bowl than it would for the same speed with a full 4.5 quart bowl.
But doesn’t the Artisan have a stronger / better / bigger motor?
The two models are internally identical. The part number for the integrated motor assembly (used beginning in spring 2023) is W11678788 for both the K45SS (“Classic”) and KSM150FB (“Artisan”). (Source: Automatic Appliance Parts web site here and here — enter “Motor” in the “aww Keyword Search” box.)
For mixers produced before the change to the integrated assembly, the part numbers for the armature and field coil (the core motor parts) are W10788171 and W10315774, respectively, in both the K45SS (“Classic”) and the KSM150 (“Artisan”). (Source: Repair Clinic web site here and here for the armature, here and here for the field coil.)
Insofar as the motors use the same parts, one cannot be “stronger” or “more powerful” than another.
Is this true for other models, too?
Generally yes, for mixers of each given model type:
Different versions of the “Epicurean”, “Professional HD”, “Professional 5 Plus”, and “Professional 600” all use the same motor and controls (and gearing). The Professional HD and the Professional 5 Plus came with 5 quart bowls; the others included 6 quart bowls. Their maximum published power consumption is correspondingly different.
The “Professional 6000HD”, “Pro Line” 7qt, and “Commercial” 8qt models again all use the same integrated motor/transmission assembly and speed control board, and consequently their rated power is reported differently as a consequence of bowl size.
Similarly, the 2023 bowl-lift models (KSM55, KSM60, KSM70) all use the same integrated motor/transmission assembly and speed control board. (The parts are different from and are not interchangeable with the 6000HD/Pro Line/Commercial models.) Their published power consumption also varies based solely on bowl size.
Note that comparing the rated power consumption across different model types is not useful, because of internal differences in how the mixers are constructed. For example, the “Professional 600” is rated at 575W with its 6qt bowl, while the newer KSM70 is rated at 500W (according to KitchenAid’s web site at this writing) — a lower maximum power consumption despite the extra quart of bowl capacity.
Isn’t this deceptive? Why isn’t there a giant scandal about this?
It’s marketing; specifically, “audience segmentation”. Whirlpool produces and sells tens of thousands of these mixers, and they know that different groups of people care about different things when they’re shopping for a stand mixer. Some groups are looking at color choice; others care about the included accessories; and still others are going to look at the rated power consumption as a measure of the mixer’s performance. I suspect they figure that if you’re going to spend more on a mixer because it’s got a bigger number on the trim band, they’ll be happy to take your money.
What should I do about this?
Buy the mixer you want, whether it’s based on color, price, included accessories, or any other characteristic that matters to you. You can buy based on the “power” claims and the numbers on the trim band if you wish; but these numbers won’t relate to the mixer’s actual capabilities. Clean it after you use it, give it routine maintenance and repairs as necessary, and it’ll run for a very long time, no matter how many watts it consumes.
The rear bearing bracket is a cleverly designed multi-functional part:
It carries a spherical bearing which provides support for the rear end of the motor shaft;
It functions as a heat sink for the phase control board (in solid-state speed control models) or for the power resistor (in pre-solid-state models);
It provides a mounting point for the speed control plate, which is a crucial part of the speed control system.
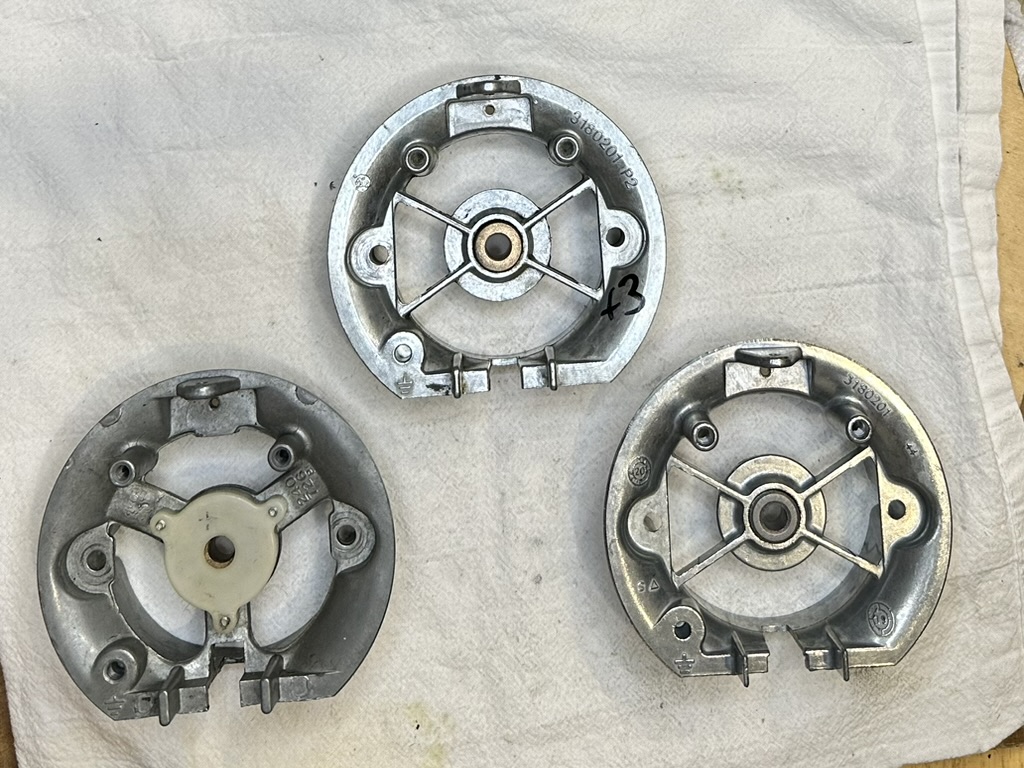
Pictured here are three generations of rear bearing assembly, with the oldest on the left, and the newest on the right. First is the inside of the bracket. (This is not ordinarily visible, since it faces into the cavity of the motor housing.)
View of the inside of Hobart (left), early Whirlpool (center), and recent Whirlpool (right) rear bearing bracket assemblies.
In the center is the rear motor bearing. This spherical bearing is held in place by a spring retainer. In the original Hobart production (left), the retainer was a copper spring, secured in place with three 4-40 thread screws.
Beginning some time in the 1990s, Whirlpool moved to a press-in spring retainer (center and right). The retainer is a steel spring, with little “fingers” that dig into the sides of the bearing well. This is faster (and thus cheaper) to assemble, but unfortunately it means that the bearing is not easily removable for replacement or refurbishing. Removing the retainer damages the fingers, and the retainer part is not available separately. That’s unfortunate, because the bearing is a wear part. It’s wasteful to discard the entire assembly simply in order to replace the bearing.
The material of the bearing itself has changed over time. The older Hobart and early Whirlpool bearings are made of porous bronze (Oilite®), which has a distinctive copper/bronze color. The later (and current production) bearings are made of iron bronze. This reduces costs as well. There’s no appreciable difference in performance here.
Also visible in these photos are changes to the bracket casting itself: the Hobart casting is thicker and stronger, and uses three heavy ribs to support the bearing. Later Whirlpool castings are successively thinner, and use four lighter ribs. The heavier casting functions more effectively as a heat sink, which allows the phase board to run cooler and allows less heat to reach the outside of the housing. The difference here is more theoretical than practical, though.
The lighter castings are more prone to deformation during installation; the unwary DIY installer or rushed assembly-line worker is at risk of bending the bracket by overtightening the nuts that secure the bracket onto the stator screws.
Finally, Whirlpool has deleted the lubrication mechanism of the rear bearing. The older bearings (left and center) were kept lubricated by a felt washer. When saturated with oil during assembly, the felt washer provides a steady source of lubrication to the bronze bearing. In the original Hobart assembly the felt washer is accessible by removing the three screws securing the bearing retainer and then lifting off the bearing cap (see photo below). In the mid-series Whirlpool assembly (center) the felt is accessible from the inside of the bearing, and may be relubricated as needed.
However, in the current generation of the assembly (right), Whirlpool has deleted the felt washer entirely. This completely eliminates ongoing lubrication of the bearing, and significantly shortens its service life. Mixers which use this bearing will occasionally present with a loud squealing noise coming from the back of the mixer. This occurs because the lubricant in the bearing has dried out, allowing metal-to-metal contact between the motor shaft and the bearing itself.
View of the outside of Hobart (left), early Whirlpool (center), and recent Whirlpool (right) rear bearing bracket assemblies.
This view shows the outside of the respective bearing bracket generations. The bearing cover (which holds the oil felt) is visible in the original Hobart design (left).
How to Quiet a Noisy Rear Bearing
If your rear bearing is making a loud squealing noise, it can be temporarily refreshed with two small drops of sewing machine oil, applied at the point where the motor shaft enters the bearing. (Only use sewing machine oil — Singer or Lily White. Do not use 3-in-1, WD-40, or anything but sewing machine oil. And use a dropper, not a sprayer, or else oil will end up in places where it will cause trouble.)
To apply the oil:
Unplug the mixer.
Remove the rear cover: first remove the small screw at the top, then tilt the cover back slightly, and lift it up slightly to disengage the hooks.
Turn the speed control to “10”. This will move the speed control plate back and give you better access for reaching the motor shaft where it enters the bearing.
Raise the rear of the mixer so that it’s tilted slightly forward. This will help the oil run into the bearing.
Apply one drop of oil to the shaft at the point where it enters the metallic rear bearing. Then, use your finger on the motor governor to turn the shaft 180° (half a turn).
Apply another drop of oil to the shaft at the same point as in the previous step. Then, turn the shaft half a turn.
Move the speed control to “off”.
Reinstall the rear cover.
In the decades since Whirlpool first acquired the KitchenAid mixer product line from Hobart, they’ve made a few cost reductions.
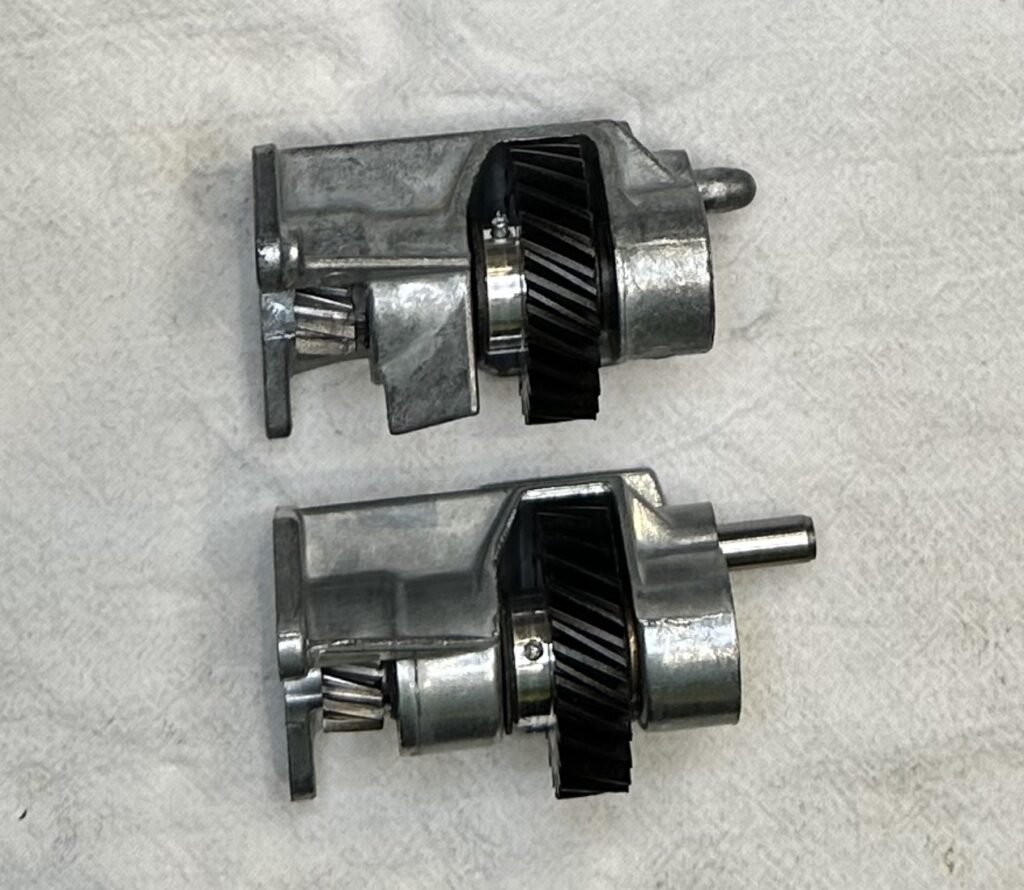
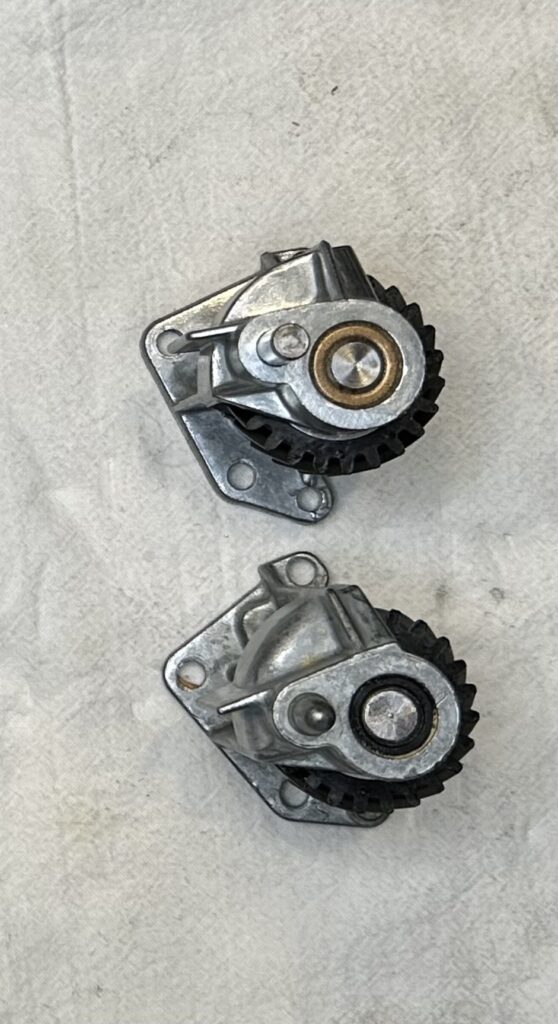
Here is one: the pinion shaft bearing, which transmits energy from the motor shaft to the main gears.
Of note here are two specific changes: the first is that the alignment pin is now cast into the bearing housing itself (top). Originally (bottom) the casting had a hole in it which accepted a dowel pin (visible on the right-hand side). The change reduced the cost of manufacturing the bearing housing, but does not appreciably affect performance.
More recently (within the last ten years or so), they switched to Delrin bearings (bottom). These are much less expensive to produce and assemble, and generally run quieter (because there’s no metal-on-metal bearing surface), but they will certainly not last as long as the bronze bearings. (I haven’t seen a worn out Delrin bearing yet, but I am sure it’s only a matter of time.)
The subject of which grease to use when regreasing your mixer, and how much, can be confusing. There are a lot of arcane terms, and acronyms, and designations, and sometimes it gets to be a bit much. Hopefully the information in this post will help. Table of Contents Glossary of Terms The following technical terms… more →Regarding Grease
KitchenAid stand mixers are both heavy and fragile; this challenging combination of attributes makes it critically important that they be packed carefully for transit, whether in a moving truck or when being shipped. By far the best way to ship a mixer is in the original factory packaging. The packing was carefully designed and engineered… more →Have Box, Will Travel
Safety warning: Doing electrical work on countertop appliances can create the risk of an electric shock, which may be fatal. Always unplug the mixer before starting work on it, and if at all possible the work should be done by a qualified individual. The discussion here is intended to be educational, and not tutorial. Vintage… more →Regarding Power Cord Replacement on Vintage Models